Showing posts with label school. Show all posts

May 4, 2016

3D Printed Piggy Bank - a Journey in Problem Solving


This is a guest post from Bethany Jones, who currently teaches a 7th grade science elective called Engineering Design in Mason, Ohio. Bethany is the mother of two tiny humans and one very energetic dog. She is a tinkerer, lover of learning and recent 3D printing enthusiast.

“If at first you don’t succeed, call it version 1.0”
This has become my motto as I have leapt headfirst into the world of 3D printing with my 7th graders. One thing I have tried to share with my students is that it’s not all about the end product, but the journey you take along the way. There is often more learning that takes place through failing than if you get it right the first time around.  

Ever since our 3D printer arrived a month ago, I have been adamant that it not just be a toy, but an avenue for creation.  I am encouraging my students to try designing something on their own that has a purpose or that solves a problem. In an attempt to show them that I was in this crazy new adventure with them, (as well as wanting to test the print size limits of the printer) I decided to make a piggy bank.

I kid you not, about an hour into the print, a group of students are hovering over the printer watching in awe and one says, “how are you going to get the money out Mrs. Jones?” Face-palm. I had forgotten to put a hole in the bottom to get the money out! 

I told my kids that we’d just have to break it open. It ended up not mattering, as this version printed with a giant mystery hole in the back. But I quickly went back to the computer and edited my model to include a money-retrieval hole in the bottom. Great teachable moment about learning from your mistakes right? 

My students and I had fun analyzing the possible causes for the other print issues and we decided to try and make the walls thicker for more support and hopefully close the mysterious hole.

The second time around, I think something went awry with the printer as everything went well until the very end. The slot on the top printed crooked and the ears  were hanging on by a thread about halfway up. Since I couldn’t find any explanation for this, I printed the same model with no edits and it worked! Third time's the charm!


I am loving the iterative process of designing, printing, redesigning and reprinting until I get something right. It is a wonderful lesson that my students are learning as well. I am finding that in a world where they may have been afraid to fail before, they are energized by the possibility that they can analyze the problem and attempt to fix it! Beyond making something cool to look at, it is something to be proud of when you can create something on your computer screen and make it come to life as a tangible object to enjoy and share with others.


*Addendum: Fast forward one day past writing this post and the poor perfect piggy version 3.0 took a flying leap off my desk and met his demise as a clean break ripped through his body, splitting him in twine. I almost cried real tears in front of my students. But looking on the bright side, as one must do to remain sane, we can now analyze broken piggy from the inside out.


May 1, 2016

4th Grader Science Fair Project: Stronger 3D Printing

Every year, my kids participate in our school district's science fair. This past year (March, 2016), my 4th grade daughter - working on her 5th science fair since Kindergarten - decided to use 3D printing as her target.

After some discussion with her 3D printing-crazed dad (ahem), she decided to test the strength of 3D Printing using different print orientations.

The problem she was working on in her project was how to print stronger 3D printed objects.

She witnessed an issue I had with some hooks I printed for my pegboard a while back, and she generally thought that was an area that could use some experimentation.
Yes - I helped lead her in this direction - no doubt about it.

Her hypothesis was that the vertical layers (layered upwards along the z-axis) were not as strong as the horizontal layers printed along the x- and y-axis. She has seen many failed prints (of mine!) and has gotten familiar with the difference between the upward layers of a print and the horizontal layers.

Two test links - one horizontal, one vertical

I'll leave all the details to the slide deck - embedded below - which she made and printed for her poster board for the 2016 Science Fair.

Mar 20, 2016

3D Printed Easter Bookmarks

This coming Sunday, many will celebrate Easter - and it just wouldn't be fair to let them celebrate without an Easter-themed 3D Printed bookmark to spread the joy!

This whole trend started on Superbowl (tm) Sunday, then Valentine's Day, then We Hate Paper day (which is actually every day), and a bunch more.

Given that I've described so much about how I've created those projects in prior posts, I won't bore you with the details on this one. I'll just share the model (at the bottom of the post).


Imagine the looks on the kids faces, when they look in their easter baskets, and instead of delicious chocolate goodies, they find a pile of 3D Printed plastic bookmarks in the image of decorated Easter eggs! Oh Joy!

"Thanks mom and dad! Now seriously, where is the chocolate?"

The Model


You can find this model on Thingiverse - along with the many other bookmark designs I've created. Enjoy!


Mar 16, 2016

BlocksCAD 102: Coding a 3D Box That Grows

Using code to create 3D Models give you the benefit of customization - the ability to take a set of parameters (values) which influence how the model looks. In the introductory BlocksCAD lesson, we learned how to define a variable and then use the value stored in that variable to change some aspect of the 3D Model. In that case we changed a single dimension of a basic rectangle model. [note: this is the 2nd in a 3 part lesson - if you missed it, go back to the prior lesson first]

In this lesson, we'll use that same technique to do something more useful. We'll write a program which creates a hollow box in any size, and later we'll give it a fitted top to match.

Some Programming basics - Inputs and Outputs


Almost all programs take some sort of "inputs" - also known as "parameters" - and then use those inputs to influence the results of the program - the "outputs".

For example - when you use Google Search, the inputs are the search terms you enter. The outputs are the search results.

When you write your own program, you get to decide what the inputs and outputs are. In BlocksCAD, the output is a 3D Model - so you decide what inputs should be accepted to influence that 3D Model that is created.

When creating a 3D model of a hollow box with a fitted top, what aspects of that box might you want to influence, and make those your inputs? Think about it a bit... I'll wait.

The Box Which Adjusts To Fit Anything


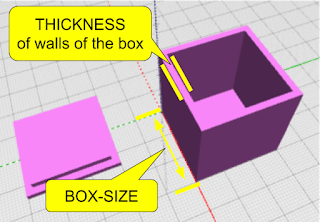
The aspects of the box I would like to control with my program are the size of the box and the thickness of the walls of the box. This way, whether I want a box to hold a guitar pick, or a box to hold a furry bunny - I can use the same program to generate the model - by just giving it different inputs to control the size! (and no, I would not recommend storing a furry bunny in a 3D printed box).

To achieve this, we will build a program using the coding blocks which use variables that can easily be changed to adjust all the aspects of the model which are dependent on them.

Writing the Code to Make The Box

First - let's plan out how to make a hollow box. The way this is often done in 3D Modeling is to create a cube which is the size of the outer dimensions of the box you want - and then create a smaller cube which can be "subtracted" from the inside of that first cube to hollow it out.
Great - and EASY!

We first decide what our Variables are. We pretty much already actually did that above - so let's just call them: box-size and thickness.  Then we'll use those in modeling the cubes we need.

> From the "VARIABLEs" category, drag over a "SET ITEM TO" block and create a "new variable" (in the drop down next to "Item") - and call the first one "block-size" - then do another variable called "thickness".

> From the MATH category, drag over a "0" number block and drop it into the "SET block-size TO" block - and change the value to 30 (we're starting with a 30mm box). Do the same with "thickness", but change that value to "2" (we're starting with 2mm wall thickness).

> Drag a "CUBE" block over.

> From the VARIABLES area, drag over the "block-size" block - which gives the VALUE of that block-size variable - and put it in the "X" component of the CUBE block. Then do the same again for "Y" and "Z". All of the 3 dimensions will be the same - 30mm.

At this point, you can test this program by just clicking the RENDER button. You should see a 30mm x 30mm x 30mm block appear in the rendered model window!

Making the Box Hollow


There are a set of very important coding blocks in a category called "SET OPS" (Set Operations) which let you do things like merge two shapes, or take the difference between two shapes. The "DIFFERENCE" block is the one we'll need here to hollow out the box - taking the difference between our original box and a slightly smaller box. If you're familiar with TinkerCAD, you know this as the "Hole" method. In Autodesk 123D Design, it is the "Combine" / "Subtract" feature.

First - let's make the smaller box. The measurement of this smaller box will basically be the size of the larger box (block-size) minus two times the thickness of the walls (once for each side). So the 30mm original box, needs a smaller box which is 30 - (2 x 2) or 26mm on the X and Y dimension - and 30 - 2 on the Z (height) dimension, so that the top of the box actually is open (we don't after all want a hollow box with no openings - we want the top to be open!)

Let's do the coding blocks now - using a new variable, some math and some transformations...

> from the VARIABLES category, create a new variable called sm-block.
This is the finished correct code for the Hollow Box.

> from the MATH catogory, take a math block which does ADDITION - then use the dropdown arrow to change that to SUBTRACTION. Take another of those same blocks again and make the second one MULTIPLICATION.

> Put the values in the blocks as shown to become the equation we described above (block-size - (2 x thickness)) and put that into the SET sm-block TO block.

> From the 3D Shapes category, take a CUBE block and set all the dimensions to the value of the "sm-block" variable.

OOPS! the smaller box was not centered
> From the SET OPS category, take a DIFFERENCE block and drag your original CUBE into the top slot, and the smaller cube into the bottom slot.

Now hit RENDER to test! OOPS! The two boxes clearly were not aligned! So the result of the subtraction did not turn out as planned.  To fix that, we'll move the smaller box to center it on the larger box - moving it by one wall thickness measurement on the x, y and z axis.

> from the TRANSFORM category, grab a TRANSLATE (move) block and set all the paarmeters to the value of the "thickness" variable.
> Put the smaller CUBE block inside that TRANSLATE block.
> Move the TRANSLATE block into the second slot of the DIFFERENCE block.

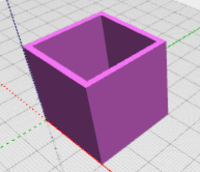
NOW test again... and BAM! You should see your hollow box.


This is Where The Magic Happens


Now - let's change the size of the box - while keeping the thickness of the walls at 2mm.
Pay attention or you'll miss it....
>  Change the value in the "Set block-size to" block to 50mm
>  Click the RENDER button.

You should now see a larger box! Play around - this helps to test your code and, assuming it works, gives you some satisfaction! Change the value of "thickness" (to 4 or 6) and click render. Those are some thick walls! Good thing you aren't stuck with that :)

In the next lesson, we'll make the Box Top - something that uses mostly the dimensions of the box but with a slight adjustment to allow for a perfect fitting top.


NOTE: this is the second in a 3-part series on making models with BlocksCAD code.
Part-1 - Making 3D Models with Code Blocks (aka Intro to BlocksCAD)

Mar 15, 2016

BlocksCAD 101 - Making 3D Models with Code Blocks

Most people say there are two ways to create digital 3D Models - 1) manually, using CAD (Computer Aided Design) and 3D Modeling software/apps - and 2) by scanning real-world objects with a camera or other scanning equipment to automatically interpret them into 3D Models.

But there's a third way to create 3D Models - you can CODE them.

Coding to create 3D Models


You can write a program which gives the computer commands which creates 3D objects. If you're a programmer, you can try something called OpenSCAD - which is basically a programming language which defines 3D objects. If you're not yet a programmer, and want to (or are willing to) learn some programming basics that pretty much anyone can learn, you can try BlocksCAD.

Overview of BlocksCAD


BlocksCAD is a block programming tool - similar to those used to teach coding to kids - which has commands and tools to create 3D Objects and is super easy to learn for kids or adults. It is available on the web, through your browser, so no programs to download and it is very friendly for Chromebooks.

BlocksCAD was developed by the Massachusetts-based Einsteins Workshop - a learning organization for kids. It combines aspects of doing simple programming (aka coding) with aspects of simple 3D Modeling. The results of BlocksCAD code are 3D Models which can be downloaded in .STL format for 3D Printing or for use in other programs which import .STL files (almost all do).

BlocksCAD interface - 3 main parts

Get Started in BlocksCAD


The BlocksCAD interface consists of 3 main parts:
1 - Library of available blocks
2 - YOUR blocks (that's your code)
3 - 3D Model Viewer

The process of creation is quite simple:

> Find the blocks you need from the Library of available blocks. Each category on the left side expands out to reveal all the blocks available in that category.

Sample flow - choosing the SPHERE block, and rendering it.
> Drag the block you need into your code area. Later you'll see how they snap together to form groups of commands - for now start simple.

> Adjust the values used in the blocks as needed. Each block has it's own options relevant to that command - for example - the Sphere block asks for the radius of the sphere.

> Click "Render" in the 3D Model Viewer to see the results!

Creating your first Coded 3D Model


Let's keep this really simple to start. Let's create a rectangle. Pay attention - this is so quick you might miss it....
> Click on the "3D Shapes" category on the left side.

> Grab the "CUBE" block and drag it to the main screen area (in the center).
> Click "RENDER" on the viewer window.

> DONE. You just coded your first 3D Model!

Notice that the CUBE block has 3 values and one option. The X, Y and Z values define the size of each of those dimensions. You can click on those and change them. Click RENDER after each change to see what they do. The "Not Centered" option could have been changed to "Centered" to put the model in the middle of all axis.

Using a Variable to Modify Your Shape


Now let's use a "variable" - a placeholder which has a value - to help define the dimensions of your shape. In this case, we'll define the X-Dimension of your cube (actually, rectangle).

> Go to the "VARIABLE" category
> Drag the "Set Item To" block into your blocks space and connect it to the top of the CUBE block. It should snap into place.
> Let's name the variable better to make it something more relevant. Use the dropdown on "Item" in the block to select "New Variable" and name it "xSize". This will represent the value in millimeters of the X-dimension of the cube.
> Go to the "MATH" category and drag the "0" value block (the tiny blue one on the top) into the empty space in that "Set xSize To" block.
> Change the value in the "0" block to "5" for now.
> In the VARIABLE category again, drag out the "xSize" block - which represents now the value stored in the variable you named "xSize".
> Drop that "xSize" value block into the cube block where the "X" value is shown (there's a "10" there now). Dropping this block will push the other block out of there. you can click that "10" block once and then hit the "delete" key on your keyboard to delete it.

You now have a simple way to model a cube with any X dimension simply by changing the value of the xSize variable. Not super useful yet - but later you will see why using variable gives you power to easily make adjustable models for customization without re-drawing models.

Advantages of Coding 3D Models


The hollow box example you will learn in the next post
The idea behind coding 3D Models is to give an automated way to create custom objects. While plenty of 3D Models are actually artistic and benefit from human creativity, some models are simply functional and can be more quickly created using rules and precise measurements. That's where coding helps.

Let's take scaling for example (making a model larger or smaller)...
Most 3D Modeling apps and even Slicer apps make it easy to scale a 3D model to get larger or smaller sizes. But, sometimes, simple scaling can not achieve the desired outcome. For example, if you have a simple, square, hollow, open-top box which is 20mm square with walls which are 2mm thick. If you want a 40mm box, you can easily scale the model to 200% before printing. But then the walls of the new box will be twice as thick - 4mm instead of 2mm. That is not likely what you wanted. Most modeling apps even let you constrain the scaling to X, Y or Z axis - but in this example, there is no way to avoid the change to the wall thickness.

With Coding, I could easily separate the thickness of the walls of this box to be it's own setting (it's own VARIABLE!). This, in fact is the exact example which we will review in the next post - so stick around! In the next lesson, we'll learn how to make a 3D Hollow Box that Grows!

NOTE: this is the first in a 4-part series on making models with BlocksCAD code.
Part-1 - Making 3D Models with Code Blocks (aka Intro to BlocksCAD)
Part 2 - BlocksCAD 102 - Coding a #3D Box that Grows


Mar 4, 2016

3D Printed 4-Leaf Clover Bookmark for St. Patricks day

After the Valentines Day Heart paperclip, the Football paperclip, the "We Hate Paper" paperclip and the Creeper Clip - I was sure the paperclip... errr... BOOKMARK phenomenon was over. But then. This.

So, first of all - they're not 3D Printed paperclips. They're 3D Printed bookmarks. 

That is so much less offensive, since everyone knows We Hate Paper. Second, Saint Patrick's Day had to be celebrated with something 3D Printed - so what better, easier way to do that than with a Bookmark? (you thought I was going to say paperclip)

Design Goals


Let's face it. I had one goal here. Simple, Fast and Cute. Oh - I mean I had 3 goals here.

Design Summary


Saint Patrick's Day has a few iconic symbols, but I think the 4-leaf clover is the only non-controversial one (I mean, I don't really even know what a Leprechaun is, and I refuse to drink green beer). So - starting with the Heart-shaped paperclip (Bookmark!), I simply transformed it using very similar dimensions.


Design Challenge


There was one very tricky part to this design. While each leaf of the clover leaf looks like a simple heart, it definitely has a distinct inward curve down the center of each leaf. It was quite hard to achieve that in a clover shape. When I used the basic heart from the Valentines Heart model, it just didn't look like a clover leaf. So I tried something else...


I basically took an elongated and flattened oval-shaped sphere (is there a name for an oval-shaped sphere?) and then cookie-cut a half heart shape out of it to make each half of each leaf of the clover. Then put those pairs together for each leaf. Then duplicated that to make four leaves. The stem was simply a curved spline extruded and rounded - and the outer clip part is a cylinder with the middle cut out.

The Model


You can get the Clover Bookmark here (don't you dare use it as a paperclip!)... and I strongly recommend printing a few hundred of these and giving them to your friends before they celebrate Saint Patrick's day!

If your friends don't like Bookmarks, you can always give them Free Donuts.


Feb 11, 2016

Creeper Paper Clips (3D Printed)

After my daughter decided that the Heart-Shaped paperclips were a great gift for her friends for Valentines day, she realized that maybe the boys in the class should have a non-heart option.

We 3D printed a few of the Superbowl football paperclips as an option, but then came up with another idea - Creeper Clips! These have the face of the popular Minecraft (tm) creature called the Creeper. It's a simple pixelated creepy face with a paperclip base.

Design Approach


There was one interesting thing about this model that's worth sharing (besides the paperclip part which I've already over-used). To get the multi-color pixelated look, I created different thickness areas on the face of the model.

original with tiny 2.5mm pixel size
To do this, I simply made 2.5mm by 2.5mm square tiles that were 0.4mm thick, and randomly (but evenly) pasted them on the base model in depths of one or two tiles. That resulted in a model which had 3 depths, each of which lets through a different amount of light and therefore gives the appearance of multiple shades of green - giving the Creeper quite an authentic look!

Adjusting the Model


Turns out the tiny 2.5mm blocks don't print that well at speed or when printing many copies at the same time. I adjusted by doubling the size of the "pixels" to 5mm squares, and got a much better result without sacrificing the look of the final print.

different height pixels colored for visibility
I also created a larger size by simply scaling up, which also increased the size of the original pixels to 3.25mm, which also worked pretty well.

The final adjustment was to give more space between the inner shape and the clip. I started with 1.5mm, which tended to crease or cut the paper that it was clipped onto - so I increased it to 2.6mm for a much better result.

The Model


Here is the Creeper Clip paperclip model. Print a few dozen to give away to your Minecraft fan friends!

Feb 10, 2016

For Valentines Day: 3D Printed Heart Paperclips

Why Paperclips?


I know - paperclips are not particularly romantic, or special, or even interesting - not even a little bit. In fact, some might say they foster the use of paper - which we would never want to do.

BUT - When shaped like hearts, paperclips become about 0.001% more interesting than when they are shaped like paperclips. And when you can say you made them yourself - on your 3D Printer - they become even more interesting (I'll say 1.7% more interesting).

More importantly - when one of these little, boring, uninteresting heart-shaped paperclips can be printed in 2 minutes on your 3D Printer - well - NOW I think think they just got 400% more interesting!

Anything that prints in 2 minutes on my 3D printer and has even the slightest utility, is a winner in my book.


I've written a few posts already on paperclips in a row (the Football for superbowl, the "We Hate Paper" clip) - so you can tell I'm a bit into this theme and I won't get into the details on this model. I'll just say, again, that these babies print FAST. I can print a dozen in under 25 minutes :)

I created these for my 9 yr old daughter to clip onto her Valentine Day cards that she gives to friends at school - so this model has been a winner all around.

There are just so many different designs you can create to appeal to the paper-lover in your life - get creative!

The Model


Here is the 3D Heart-Shaped Paperclip model so you can spend 2 minutes getting one for yourself.
I'm posting this model hopefully with enough time for you to get busy printing hundreds in time for Valentines Day.

Feb 8, 2016

"We Hate Paper" Paperclips are ironic

When I started designing simple, fast-printing 3D printed paper-clips, it was clear I was delving into an area I don't really support - that is, the over-use of printed paper in school. I'm not a fan of paper-based assignments in most cases - unless the paper adds to the learning objective somehow (like in art, origami, or...uh... confetti for parties ;).

I had an idea - what if I made a paper-clip which expressed my distaste for the over-use of paper? It would be fun, perhaps funny, and definitely ironic to have a paper-clip which expressed distaste for paper ;)

The "We Hate Paper" paper-clip is the result. It's possibly just a start for a whole line of "We Hate Paper" products.

I'm often looking for ways to use 3D Printing within an educational context - in school - as part of a learning objective - but I never expected that teaching "irony" would be one of the possibilities.

The Model

The "We Hate Paper" paper-clip model is posted and free on Pinshape so you can print it yourself.
If you're a teacher, print a whole load of these for your class to get a laugh from them or their parents. If you're a parent, print a bunch for your kids to clip to their paper homework to return a subtle message to the teacher ;)

Feb 7, 2016

Make a Football Paper Clip - Fast, useful 3D Printer Project

In honor of the Superbowl today, I wanted to design a really easy football-themed model which was both useful and super fast to print. Small, useful models which are fast to print are really great for school projects where many kids are often waiting for a single printer, and looking for results within on class period. This model achieves all that.

Design Goals


My main goal was to have a football theme. What better way to achieve than than by using a model of a Football! My second goal was to have the result be somewhat useful - not just a trinket.

You probably know I've done lots of trinkets, and both kids and adults really like those, but I am becoming partial designing and printing more useful things. Third - I wanted this to be a small model which could print fast and reliably.

Design Details


One of the things I dislike most about classrooms today is the continuous and heavy use of paper. There's just so much more that can go digital but hasn't yet - and paper often adds a burden in paces where it is unnecessary.

That said, I decided to design a paper clip - ah.. the irony.

I've noticed in previous flat-model printing I've done that the printed PLA in heights of 1-2mm is quite flexible. I figured I could create a paperclip-like structure quite easily on a flat surface, in practically any shape I wanted.

I tried a football shaped design. Here's the steps I used to create this:

1 - Sketched an oval with 6 points using the "Spline" tool in 123D Design - getting a Football shape pretty easily. It was about 30mm wide and 50mm long.

2 - Extruded the football to 1.4mm deep.

3 - Duplicated and reduced the size to about 75% the original.

4 - Shelled out the original to make it just an outline of about 3mm width.

5 - fit the smaller football inside the larger outlined football leaving approximately 1-2mm gap between the two (that's the space the paper will fit when it's a paper clip).

6 - create a connecting rectangle which is 3mm wide, long enough to bridge the gap between the objects and 1mm high. I place that at the tip of the football connecting the two parts.

7 - Use short rectangle pieces which are 1mm wide and 1mm tall - to create a "laces" pattern on top of the inner football (see the picture to understand what this looks like).

3D Printed Results


After a little tweaking, I ended up making the inner football slightly higher than the outer outline shape and gave it rounded edges (using the Filet tool) just to make it look better. I also did a bunch of experimenting with height to get the right balance between strength and flexibility.

The Model


In case you don't feel like starting from scratch to make this yourself, and just want the immediate satisfaction of printing a few (or a few dozen) of these now, I've posted the Football Paper Clip model on Pinshape for you to use.

If you're having people over for the superbowl today, print a few and give them out to your friends ;)

And just in case you think I've created this model because I like paper, I've also created this other paper clip design, shown here, to clarify my position...

I think I'll give these out by the dozen at my kids' schools :)

Here's that "We Hate Paper" Paperclip Model - also free on Pinshape - in case you want to inspire your school to reduce the waste and time innefficiency ;)

Sep 14, 2015

3D Printed Pen Holder V2 - the "Peacock"

Just a few hours after using my first print of the "Porcupine" pen holder - I had a dozen new design ideas. One of them I had to immediately pursue, as I knew it would be more compact, take less time to print, and present the colored markers in a really cool display pattern.

One recommendation I always make is to save the individual elements of your 3D Models as you are making them BEFORE you combine them into a single object. That paid off for me here - as I went back to the elements used in the Porcupine model and was able to easily re-purpose them into the new Peacock design.


The basis of this design was to increase he density of pens which could be held into less space. To do that I interleaved the individual pen holder cylinders in two rows with each row facing inward toward the other so the pens criss-cross in a line. I also shortened the cylinders by about 10mm to make it print faster.

Another modification I made was to add personalization - with our @MkrClub twitter handle proudly embossed on the front of the model :)

Sharpie, of course, is a trademark of Sharpie corporation...