Showing posts with label Reviews. Show all posts

Aug 11, 2018

The Glowforge Laser Cutter (Product Review)

This post is my lightweight review of the Glowforge Laser Printer/Cutter - the long-awaited #maker tool that promised to make laser-crafting something anyone could do in their home.

Quick Summary

After using the Glowforge Plus (middle model) for a few weeks, I'm extremely positive and 100% satisfied with it. I've worked with acrylic, wood and cardboard - and mainly with custom designed projects so far, and I've had no issues and have a very positive experience with the company and the community forum.  (Note: if you're thinking of buying one, this link will give you a $100 - $500 discount and will give us referral points for craft materials so we can do more project posts here! ;)

I waited too long to buy my first 3D Printer - probably 2 years from the time I considered it. Once I dove in, I regretted that wait and wished I started earlier. Recently I started getting the same feeling about trying Laser Cutting - but this time was different. I saw laser cutters before, and they were simply too high maintenance and "shop ready" rather than "home ready". So I waited, hoping that I could eventually see a more home ready laser cutter at some point. Then, Glowforge happened - and while this kickstarter-born phenomenon took way longer to launch than I had hoped, it finally did start shipping this summer, and I committed.

Pricing

While the Glowforge was not cheap (gulp - $2,495 for the entry level, $3,995 for the middle model and $5,995 for the pro level as of this writing - I got the middle model), it met all my other criteria and was clearly angled to the "Easy enough for anyone" category. That promise has been the most positive aspect of the product.

Un-boxing

The Glowforge was packaged and shipped with high attention to detail and safety - but easy to unpack, even with it's large size. I was pleasantly surprised that it also came with a huge box of various sample materials - and following the simple directions online, I was set up and printing/cutting within an hour from delivery! Set up of the hardware and the software was REALLY easy. Since all the print/cut prep is done on the software and the device itself only has one button!

Setup & Venting

The main setup challenge for some buyers will be the venting - make sure you can put this near a window or external vent. I'm lucky to have a window nearby and I use the INCLUDED dryer-vent-style hose to vent the exhaust through a window rig. Glowforge is apparently creating a filter system - but that's not available yet - so venting for now is a must. If you don't have a way to vent the exhaust from cutting, don't buy any laser cutter. The exhaust fan in the Glowforge is powerful, and it does a great job of pushing the cutting exhaust through the vent.

The App (in your browser!)

The GlowForge App home - where my designs live
The Glowforge App is available on the web - which is HUGE... That means I can get to it on a chromebook or any other device -  and I am able to access all my designs, interact with the printer, even see the print/cut bed through the built-in camera. It is incredibly easy to use - to align a design - even resize, move and rotate it - so that it prints on the material that is in the printer at the time. This really helps to maximize usage of the material you have (by using the un-used sections of partially used material). There is also an iOS app, but I haven't tried that...

To get a design into the Glowforge app, I can upload it (SVG format is what I use) or even put a printed or even hand-drawn version of the design in the printer, scan it, and then print/cut it on the wood/acrylic/whatever material! It's truly magical to let my daughter draw something - scan it in the printer - and then cut that design onto the material!

First Projects

One of my first custom-designs was a tiny jigsaw puzzle. I used a simple drawing product on the ipad (vectornator) and exported the SVG. pulled that into the Glowforge app, and in 1 minute, 48 seconds, the puzzle was done - on draftboard (chipboard-like wood from Glowforge sample pack). It came out AMAZING!  I've experimented with making photo puzzles, and almost have a winner ;) - just have to play more with protecting the photo during cutting  (look for that post coming soon!).
I also printed one of their sample boxes which had intricate connectors that worked incredibly well.

I've included images (and one quick video) of some early projects I made - puzzle, custom-designed box (to store the puzzle) and the pre-designed box from the Glowforge library.

Glowforge Community & Library

The online resources at Glowforge.com are incredibly valuable. The community is very active and responsive - so any questions I had were answered within a day by experienced owners and the company itself. I've been finding answers there for practically every topic - including cutting non-standard materials, venting ideas, design apps, etc.There is also a library of designs - some free, some for pay, which is definitely another great resource, particularly for those who are not inclined to start from scratch.


Summary

This was a tough purchase decision - practically the cost of a small family vacation - but the Glowforge has exceeded my high expectations in every way! If you're a crafter, who makes a business making things, the Glowforge seems like a must-have. If you're a #Maker, 3D-printing enthusiast or a just a hobbyist and just want to tinker with Laser-cutting, you should seriously consider the Glowforge.

Watch this space for posts on the Glowforge projects we pursue here at MkrClub - I've already got a few really fun projects done and waiting to be posted.  And - If you found this review helpful - feel free to use THIS LINK to buy the Glowforge - as it will give you a great discount and give me referral points for buying materials for projects :)

Jan 8, 2017

The NewMatter Mod-T 3D Printer - reviewed and liked!

I'm not the fastest to review things - and this one is no exception. It's been about 18 months since I first saw this Mod-T printer from NewMatter - and I finally got to use it and review it a few months ago. Well, It took me even longer to mention it on my blog - but here it is!

Watch the video - or I've posted the text version below it...


I’m always looking for great 3D Printers - at reasonable prices for practically anyone - but especially for educators. The NewMatter Mod-t 3D Printer is a great find in this quest.
I first saw this printer at the NYC makerfaire in 2015, and even back then, just the look and elegance of the printer’s industrial design stopped me in my tracks. Almost a year later, I finally got to test one out for myself. The bottom line is that I like this printer and would definitely recommend it especially for people with a budget under $500.

The unboxing was a pleasant experience - a well-protected printer body, which required almost no assembly, and a well-organized set of well-labeled boxes for the minor parts that had to be assembled and the tools which come with the device.

The clear instructions direct you to their online site to get fully set up - where I had to create an account to continue. While slightly annoying, it was reasonable and worthwhile given the pleasant experience that followed. The newMatter software for set up is not web-based, it runs on windows and Mac - but was easy to get installed. After setup of the software, I was instructed to “download firmware updates” - which went smoothly.

Connecting the printer to my home wifi was mostly easy - but 5Ghz networks were not recognized so you need a 2.4 Ghz network to get up and running. There were some small bumps getting through the complete printer connection process - but within a few minutes I got through that and realized with delight that I would be able to control my printer now from a web interface, which gave super clear instructions on how to finish the printer setup. The site also has simple button controls to do things like load the filament and see the status of the printer. I mounted the light blue 1.75mm PLA filament which came with the printer onto the plastic spool holder which connects to the back of the printer, and loaded it into the hole clearly marked “filament” in the back. Then, I used the web-based printer controls to get the filament fully loaded.

My first print was something simple and small - I picked my simple pegboard hook that I know only takes about 10 minutes to print. Once I figured out how to upload my own models - which wasn’t as clear as I would have liked - but has become easier in latest updates - I uploaded my model and used the clear online controls to setup the parameters for printing. It was set a bit hot - 210C - so I lowered it to 185C and started it up.

There aren’t quite as many printing options as something like Cura for printers which require GCode to be directly loaded - but that’s the whole point of the Mod-T - to make printing simple. So the advanced options are somewhat out of the way intentionally. While there were some general usability issues with the online printing interface, practically all my main concerns have already been addressed - and while it is simple and not for the advanced 3D printing professional, it is easy to use.

At the start of the print, there was certainly lots of print bed movement - which is clearly a process to home the print bed and perhaps auto-level it - but this was not excessive - and after the printer extruded a line of filament on the side of the bed to prep for printing, my object began to print.

The fan of this printer is quite loud without the cover on, but once the cover is on, the printer is pretty quiet - so I can see how that makes it more friendly than other printers which have no enclosure.

I was very pleased with the way the model adheres to this print bed - which is clearly made of a special material which is intended to be good for this purpose. This is becoming more common in printers - and with the dozen prints I did, I had no problems with models adhering to the bed - and used no additional materials like hairspray. Note that I ONLY USED PLA - I did not attempt ABS.

The subsequent tests I did included one of my favorites - a single-print hinge. This model has a bunch of one-half millimeter gaps between parts that are intended to move freely - and you can see in the video that it printed rather well and just required a bit of forcing to freely move the hinge - almost exactly the same amount as that required when this model is printed on a printer which is literally 4 times the price of this one. I was very happy with the results here.

I also printed a few other models including a thin-walled desk organizer in the shape of my initials - which has lots of curves  - and it came out quite smooth - a great result on the first try.

While the Mod-T has a very innovative mechanical design for the bed movement, which completely avoids belts and allows the bed to easily be removed and replaced - it is not necessarily space efficient. The footprint is approximately 15 inches square with the filament spool and 13.5 inches tall. The build envelope is 6 x 4 x 5 inches - 120 cubic inches - which is pretty good for most hobby projects.

I’m not thrilled with the process of changing filament color - but that’s pretty much par for the course for most 3D printers. I’m spoiled by the ease of filament changes in the Polar3D printer.

Overall, the Mod-T seems like an incredible value for an elegant, easy to use 3D printer. While no 3D printer these days is a completely user-friendly appliance - the Mod-T comes closer than many I’ve tried and it’s elegant external design could be on display in your home or even the museum of modern art. At $399, it’s definitely one of my top recommendations for printers under $500 - and while I haven’t used it long enough to call it reliable, I would say that I’ve had no clogs, no failed prints due to adherence to the bed and generally no issues with the software.


Apr 10, 2016

Expanding Creativity With A 3D Printing Pen

3D Pens have popped up everywhere. Ok, not everywhere - like there are none in my sock drawer - but certainly in stores and online where, just a year ago, you would not have seen them.

If you have already tried a 3D Pen or bought one or generally know about them, you can stop reading now. If you wanted to understand the basics of what they are, this short post should help you.

What is a 3D Pen?


A 3D Pen is an electric tool which lets you create things out of plastic. It's a creative tool - perhaps it could even be called a toy. It is what I would call a modern version of play-dough.

Most 3D Pens take a strip of plastic "filament" into one side, heats it up to around 175 degrees Celsius (347 Fahrenheit!) and forces it out of the other side (tip) of the "pen" in a narrow stream allowing you to "draw" with it.

As the plastic dries, it hardens back into firm plastic, remaining in whatever form you created. If you've ever decorated a cake with one of those pastry bags, you pretty much know how to use a 3D Pen.

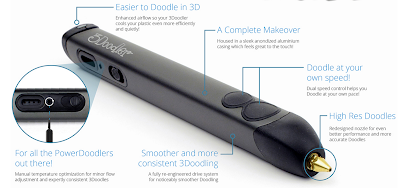
The plastic used is typically the same as that used by 3D Printers. PLA is the best option, as it has less harmful (or worrisome) fumes and melts at a slightly lower temperature (although, 345F is still pretty darn hot!). Some 3D Pens expect you to use their own "plastic sticks" - like the 3Doodler - but I prefer pens which are friendly to the same filament I'm using with my 3D Printer, so I don't have to buy separate material.

Scribber 3D Pen has a clear screen to show the settings

Controlling the 3D Pen


There are some basic controls on most 3D pens.

Temperature is the most important, as different plastic requires different temperatures.

Speed is another option on some pens, so you can control the rate at which the melted plastic comes out of the tip.

Then there's the motion - all pens which use plastic filament have both a forward (for drawing) and reverse (for removing un-used filament) - which allows you to "draw" or stop as you want to. That's pretty much it. Simple.

World's First, and My First - 3Doodler


The 3Doodler 1.0 - the original
The first 3D Pen I ever saw - in September 2014 at the MakerFaire in NYC - and apparently the first one ever invented, was the 3Doodler.

That first version of the 3Doodler, which I bought pretty much at first sight, was good - but not excellent - which is pretty expected given it was the "world's first". It was loud (it even has a fan in it) and bulky and had inconsistent reliability in my experience and clogged a couple of times too.

The 3Doodler 2.0 - from 3Doodler's site
That said, the first early 3Doodler helped me understand the concept well and frankly, amazed me.

Since then, the 3Doodler company greatly improved on their original design and now sells their second version which I don't own yet. IT has been considered by others to be a huge improvement over the first - Less bulky, quieter, more reliable.

I'll definitely try the version 2.0 3Doodler eventually, and I have the utmost respect for this company's founders, as they really innovated and broke new ground, defining this whole product category. You can now buy the 3Doodler in almost every innovative electronic-friendly toy or game shop and even in Brookstone and other high-end retailers.

3D Pens Galore


Scribbler 3D Pen
With 3Doodler's success in this new product category, it was inevitable that others would follow to create similar products. I've seen all sorts of variations on this theme now, but most are just basic knock-offs.

I decided to try one called the "Scribbler 3D Pen" (3rd generation). It was highly rated on Amazon and - at the time - was on sale for $69. (As of this writing, it is $99 in all the listings I could find).

I saw one completely new 3D Pen design at the NYC Toy Fair this past February called CreoPop - which uses liquid "ink" without heat - rather it uses LED lights to dry the ink as it emits from the pen's tip. This also seemed to allow more option in material with glow-in-the-dark, neon and more colors. This looked cool, but I haven't had a chance to try it first hand.

New 3D Pen version for kids coming


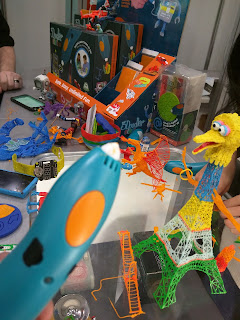
3Doodler Start and some creations
3Doodler is also showing and taking pre-orders for a completely new product called the 3Doodler Start.

This version operates at a much lower temperature with completely new filament which is non-toxic, making the whole kit much safer for younger kids!

I saw this product at the NYC Toy Fair in February 2016, and was VERY impressed. I expect this product to be a huge success for kids and schools if it proves to be reliable with reasonably priced filament. Nice to see 3Doodler continuing to innovate in 3D Pen Printing.

Conclusion


If you love crafts and Maker projects, and often have the opportunity to work with kids to encourage them to experiment and try new things - get a 3D Pen. Make no mistake - this tool is not for creating precision objects as you might do with a 3D Printer. This tool is mainly for creativity and art.

I haven't worked with enough different models to absolutely pick which is best and recommend a "winner" - but I will say that I've had great luck so far with the Scribbler 3D Pen myself and have heard good things about 3Doodlers 2.0 version.

Check ratings on Amazon and Google Shopping to get a broader opinion before buying.

Mar 16, 2016

BlocksCAD 102: Coding a 3D Box That Grows

Using code to create 3D Models give you the benefit of customization - the ability to take a set of parameters (values) which influence how the model looks. In the introductory BlocksCAD lesson, we learned how to define a variable and then use the value stored in that variable to change some aspect of the 3D Model. In that case we changed a single dimension of a basic rectangle model. [note: this is the 2nd in a 3 part lesson - if you missed it, go back to the prior lesson first]

In this lesson, we'll use that same technique to do something more useful. We'll write a program which creates a hollow box in any size, and later we'll give it a fitted top to match.

Some Programming basics - Inputs and Outputs


Almost all programs take some sort of "inputs" - also known as "parameters" - and then use those inputs to influence the results of the program - the "outputs".

For example - when you use Google Search, the inputs are the search terms you enter. The outputs are the search results.

When you write your own program, you get to decide what the inputs and outputs are. In BlocksCAD, the output is a 3D Model - so you decide what inputs should be accepted to influence that 3D Model that is created.

When creating a 3D model of a hollow box with a fitted top, what aspects of that box might you want to influence, and make those your inputs? Think about it a bit... I'll wait.

The Box Which Adjusts To Fit Anything


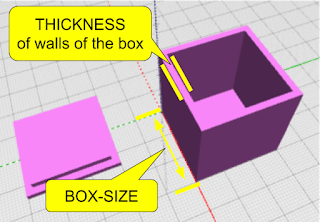
The aspects of the box I would like to control with my program are the size of the box and the thickness of the walls of the box. This way, whether I want a box to hold a guitar pick, or a box to hold a furry bunny - I can use the same program to generate the model - by just giving it different inputs to control the size! (and no, I would not recommend storing a furry bunny in a 3D printed box).

To achieve this, we will build a program using the coding blocks which use variables that can easily be changed to adjust all the aspects of the model which are dependent on them.

Writing the Code to Make The Box

First - let's plan out how to make a hollow box. The way this is often done in 3D Modeling is to create a cube which is the size of the outer dimensions of the box you want - and then create a smaller cube which can be "subtracted" from the inside of that first cube to hollow it out.
Great - and EASY!

We first decide what our Variables are. We pretty much already actually did that above - so let's just call them: box-size and thickness.  Then we'll use those in modeling the cubes we need.

> From the "VARIABLEs" category, drag over a "SET ITEM TO" block and create a "new variable" (in the drop down next to "Item") - and call the first one "block-size" - then do another variable called "thickness".

> From the MATH category, drag over a "0" number block and drop it into the "SET block-size TO" block - and change the value to 30 (we're starting with a 30mm box). Do the same with "thickness", but change that value to "2" (we're starting with 2mm wall thickness).

> Drag a "CUBE" block over.

> From the VARIABLES area, drag over the "block-size" block - which gives the VALUE of that block-size variable - and put it in the "X" component of the CUBE block. Then do the same again for "Y" and "Z". All of the 3 dimensions will be the same - 30mm.

At this point, you can test this program by just clicking the RENDER button. You should see a 30mm x 30mm x 30mm block appear in the rendered model window!

Making the Box Hollow


There are a set of very important coding blocks in a category called "SET OPS" (Set Operations) which let you do things like merge two shapes, or take the difference between two shapes. The "DIFFERENCE" block is the one we'll need here to hollow out the box - taking the difference between our original box and a slightly smaller box. If you're familiar with TinkerCAD, you know this as the "Hole" method. In Autodesk 123D Design, it is the "Combine" / "Subtract" feature.

First - let's make the smaller box. The measurement of this smaller box will basically be the size of the larger box (block-size) minus two times the thickness of the walls (once for each side). So the 30mm original box, needs a smaller box which is 30 - (2 x 2) or 26mm on the X and Y dimension - and 30 - 2 on the Z (height) dimension, so that the top of the box actually is open (we don't after all want a hollow box with no openings - we want the top to be open!)

Let's do the coding blocks now - using a new variable, some math and some transformations...

> from the VARIABLES category, create a new variable called sm-block.
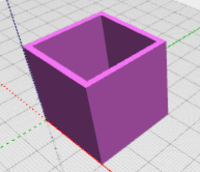
This is the finished correct code for the Hollow Box.

> from the MATH catogory, take a math block which does ADDITION - then use the dropdown arrow to change that to SUBTRACTION. Take another of those same blocks again and make the second one MULTIPLICATION.

> Put the values in the blocks as shown to become the equation we described above (block-size - (2 x thickness)) and put that into the SET sm-block TO block.

> From the 3D Shapes category, take a CUBE block and set all the dimensions to the value of the "sm-block" variable.

OOPS! the smaller box was not centered
> From the SET OPS category, take a DIFFERENCE block and drag your original CUBE into the top slot, and the smaller cube into the bottom slot.

Now hit RENDER to test! OOPS! The two boxes clearly were not aligned! So the result of the subtraction did not turn out as planned.  To fix that, we'll move the smaller box to center it on the larger box - moving it by one wall thickness measurement on the x, y and z axis.

> from the TRANSFORM category, grab a TRANSLATE (move) block and set all the paarmeters to the value of the "thickness" variable.
> Put the smaller CUBE block inside that TRANSLATE block.
> Move the TRANSLATE block into the second slot of the DIFFERENCE block.

NOW test again... and BAM! You should see your hollow box.


This is Where The Magic Happens


Now - let's change the size of the box - while keeping the thickness of the walls at 2mm.
Pay attention or you'll miss it....
>  Change the value in the "Set block-size to" block to 50mm
>  Click the RENDER button.

You should now see a larger box! Play around - this helps to test your code and, assuming it works, gives you some satisfaction! Change the value of "thickness" (to 4 or 6) and click render. Those are some thick walls! Good thing you aren't stuck with that :)

In the next lesson, we'll make the Box Top - something that uses mostly the dimensions of the box but with a slight adjustment to allow for a perfect fitting top.


NOTE: this is the second in a 3-part series on making models with BlocksCAD code.
Part-1 - Making 3D Models with Code Blocks (aka Intro to BlocksCAD)

Jul 9, 2015

The Polar3D 3D Printer - Very Impressive

I discovered the Polar3D 3D Printer at the ISTE Education Conference in Philadelphia last week, where many 3D printer companies attempt to capture educator attention right along side other education technology products. When I saw this printer - 15 of them in fact, all cranking away printing models - I immediately knew it was different and that I needed to try it.

The small footprint, unique radial bed design and apparent simplicity of the technology is what attracted me. The two passionate and experienced engineers who invented this product, who were also running their own booth and answering questions, also got my attention. The web-based printer command center put me over the edge.

Setting it up

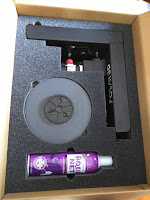
From un-boxing to printing took me about 20 minutes. I was being careful and slow, but the one page description which came with the printer - while brief - was pretty much all I needed to get this simple printer into action.
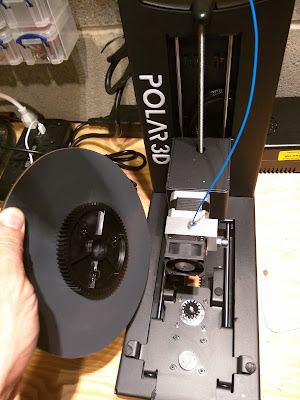
The hardware setup was ridiculously simple. This printer is basically two parts in the box, not counting the power cord and the (almost hysterically funny) cannister of hairspray which is included. Hardware setup was one step (not counting again the plugging in of the cord). The print bed - a round piece of mirrored glass with a big gear on the bottom, just sets into place to fit with the gear on the printer. That, it turns out, is the genius behind this printer's radial design - which overall reduces the moving parts and belts and other things that could go wrong.

Getting the WiFi connection set up was also simple, but to be fair,  might be harder for people who have not done something like this before. Basically it was a matter of connecting my computer to the printer's WiFi signal, then telling the printer about my home WiFi so it could connect itself - then reconnecting my computer to my normal WiFi. Alternatively, I could have connected my computer to the printer directly via ethernet.

The Hardware

The Polar 3D is small and sturdy. It measures just 8 inches wide, 15 inches high and needs approximately 15 to 21.25 inches of depth (12.75" base + 2.25" for the bed movement forward and another 6.25" for the filament spool holder, which is optional). This especially narrow footprint achieves a build volume of 8 inches in diameter by 6 inches high. The radial movement design is what accounts for this rather generous build volume in that small footprint, as the extruder only has to travel the radius of the circular bed - meaning the bed spins as it moves back and forth on the y axis - rather than the whole distance of the y or x axis.
Full specs can be found at the Polar3D website.

The printer is strong and weighty enough in a good way without being too heavy. It is practically all metal, except for a plastic molded handle insert which makes it comfortable to carry. That handle and the small physical size makes it basically mobile, and I wouldn't hesitate to take this printer with me to a school or to the office or even a friends house to show it off and print stuff for a few hours.

Some additional nice hardware features include the built-in micro-camera, which lets you watch your prints live, the easy to remove/clean circular bed, which is by far the simplest design I've seen yet, and the incredibly simple extruder design, which makes loading filament easy. That extruder design lets you use multiple filament types such as Ninja-Flex in the single extruder (by the companies claims only so far - I have not tested this). These are not actually small things - they could be huge differentiators if they all pan out to be working as expected.

The built-in Raspberry Pi micro-controller provides strong performance, connectivity, on-board model storage (16Gb, with about 8Gb avail for models) and more. There are also several connectivity ports, including Ethernet, USB Serial port and a USB Thumb drive port for direct access to stored model files. The printer also includes WiFi - it emits a WiFi signal to gain initial connectivity where you configure it to connect to your local home or school network. This is how I have used this printer thus far with practically zero issues (one time it disconnected and had to be reconnected).

The Software (Web Services)

The Polar3D is more than just a printer. It is a set of very powerful software products and services which have actually made the experience of using the printer an absolute delight. All their software is either installed on the printer directly or available through the web-based cloud services. With my beloved Lulzbot TAZ4, I still use an SD card to run models back and forth between my Mac and the printer for printing, or I connect my Mac directly to the printer. With the Polar3D, I do everything through the web - sending my models for printing directly to the printer. This will be how things are done much more broadly, I am sure.

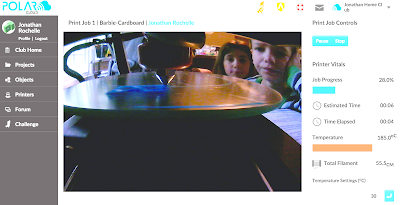
The Printer Control Panel. 

The built-in camera lets me see the print live in progress,
and see the kids watching it ;)
Polar3D provides a cloud service where you can connect, and control, your printer and even multiple printers. I'm interested to know how to get non-Polar3D printers connected now that I've used and learned to love this part of their offering. I saw the founders control their 15 running printers from their Polar3D cloud interface at the ISTE conference where I met them - and it was incredible and useful.

Since each printer also has a camera onboard, you can see the progress of every print live from anywhere you can gain web connectivity. To go one step further, every print job run is saved in the printer's history - so you can see information about all the prior print jobs, and - wait for it - you can watch a time lapse" video of any prior print which is automatically saved! I can also see the configuration settings from that history and download the STL among many other options. #mindblown

The control panel is one of the most impressive aspects of this company's software offering - and I was initially sure that it was a turn-key provided by another vendor, but it's all theirs. That Web-based (Multi!)printer control panel seems like something that quickly needs to become a service offered separately from the physical purchase of their printers - similar in a way to what MakerBot did with Thingiverse.

Clubs, Objects, Projects and more

The capabilities to organize objects and projects online, through a web-based interface, are also extensive in the Polar3D cloud service. They offer Clubs, Objects, Projects, Collections and more.

Clubs give you the ability to virtually have your own object sharing service which you can manage while inviting others to participate or co-manage. I can see this being used effectively in schools, tech clubs, maker-spaces and more.

Objects (3D Models) can be uploaded and shared through the Polar3D service and the common "favorite" count and "collect" count lets you see how popular they are.

Projects provide educators a place to describe lessons related to 3D Printing, allowing uploads of supportive materials like documents and images. This is a much more general capability than something tied to 3D Printing specifically.

Collections and subjects allow another level of managing and organizing objects. There are public collections and club-based / private collections.

I haven't used all these capabilities enough yet to give a detailed review or critique, but I'm excited about the abilities to both organize and even "white-label" my own collection of objects for both managing and sharing. I'll write more on this later for sure.

The Slicer.

Polar3D integrated the CURA open-source slicer into the printer so that you just feed it objects (.STL files) and it slices and dices (I mean, prints) the object directly. You can get into the CURA settings if you want to, but the point for some people will be that you shouldn't have to. I've found my early simple prints to be really good on the default settings, with minor issues only when I tried to do things like remove supports on a print which really did need some. The interface to the CURA settings is certainly different than CURA itself, but it was easy to find my way around - with tabs for Quick Start, Basic, Advanced and Start/End Gcode.

The Modeler (?).

Yes - there is even a modeling capability built into the Polar3D software stack. That said, I don't use it and didn't really go beyond building a simple stack of shapes. Nor did I try to print anything made in it. I don't see the need for this, but it's potentially useful to have it in cases where you just need a simple model or adjustment in a pinch and forgot your password to TinkerCad or 123D Design ;) (I use the latter and see no reason to change that).

The results

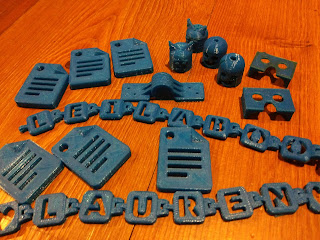
I've printed about a dozen, mostly small, models and I must say the results are incredibly good. When I tweaked the slicer settings to my liking - such as improve the quality (reduce the layer height from 0.32 to 0.2), the results were impressive and consistent. I even tried to print the small, challenging interlocking "Alpha-let" bracelet links, which require good, small precision for the interlocking design to work - and it printed 9 links at a time with perfect results. The prints from this printer required even less cleanup than my TAZ4 (which everyone knows I love).

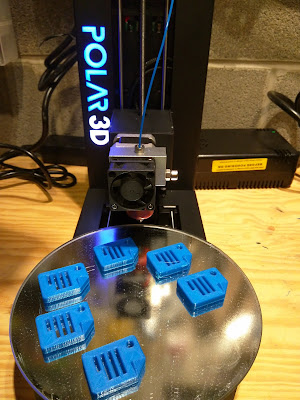
Since I only had blue 1.75mm filament), I printed one of my favorite blue models - the Google Docs icon I designed very early in my 3D Printing life. I printed one alone, which came out perfect. I tried to print 6 at a time, and again, all 6 came out perfect.

The best test was my own 3D Hinge design. This one is challenging, as it prints both sides of the connected hinge in one run with only 0.4 - 0.5mm between the moving parts - giving lots of opportunity for unwanted binding of the moving parts. There was definitely some unwanted binding in this print - but with a little cajoling and loosening the intended gaps with the clam knife (my favorite 3D Printing tool), the hinge loosened and worked like a charm.


Some early models printed on the Polar3D. All Blue ;-/

Summary

The Polar3D printer is unique in ways which make it very desirable - not just novel. The narrow footprint, simplicity of the hardware, quality print results and robust web-based printing control software all top my list of positives. Of course, the price point - $599 for educators and $799 retail - make it truly a reasonably priced printer for schools and others. Seeing 15 of these printers cranking away making models all night and day at the ISTE education conference gave me initial confidence that this printer was for real - and trying it on my own so far has proven the reliability (albeit early) beyond a doubt. If it turns out that I can actually print multiple filament types - like Ninja-Flex - through this one extruder... wow, that'll really be a bonus!

On the downside.... uh... well.... the build volume could of course be bigger and the power supply transformer could be slightly quieter. Of course there are also small things I might recommend be changed in the software design (if I stretch), but overall, it's incredible how much this small company has already achieved and provided in this printer.

While only having used this printer myself for about 10 days, so far, I highly recommend it. I'm excited about how the unique radial design has simplified the mechanics and how the web-based printing control truly makes life easier (well, for 3D printing, not life in general ;).