Aug 28, 2015

3D Print Your U.S. State in 15 minutes

When you want to 3D print something, first you have to 3D model it, or find a 3D model that someone else made. I was thinking up projects for kids in school, and thought geography would be fun - perhaps to make 3D models of their country or U.S. state - to show off as a backpack charm or to use as a physical model in lessons.

Of course there are some U.S. State objects already modeled on Thingiverse, but not much on Pinshape and others - and besides, half the fun is in the modeling. So I wanted to share how I pursue a project like this to get it done literally in 15 minutes - INCLUDING print time (if I make it small enough). Note - if you live in Wyoming, Kansas or other mostly rectangular shaped states, this is more like an 8 minute printing-only project ;)

Summary

You will trace an image of the object (state or country) using Google Draw (as outlined in a prior post) and then import that into your 3D modeling app to make it 3D ("extrude" it) - then send it to your printer for printing. Easy peasy.

Step 1 - Find an image to "trace"

Go to Google Image Search and find an image of the object you want to model. In my case it is the state of New Jersey. Download that image for temporary use (which you will later completely delete). I use something from an official .gov site that I'm sure provides free access with no copyright restrictions for my use.

Step 2 - Open Google Drawings

Go to http://drawings.google.com while signed in with your Google account and it takes you immediately to a new drawing canvas. You can also go to Google Drive and use the NEW button - and under "More" is Google Drawings.

Step 3 - Import the image for tracing

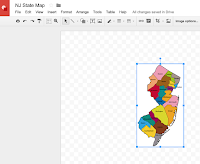
Use the Insert Image button and import the image that you saved in step 1.

Step 4 - Trace the image

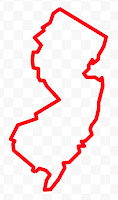
Use the "Polyline" tool (in the dropdown icon where the "line" tool is shown). and slowly create line segments around the outer edge of the image you are tracing. I suggest zooming in pretty far and not trying to get too detailed, as much of the detail will be lost in a 3D print of manageable size. If your line stops extending, just start a new segment at that last point and later group all the lines into one object.

Step 5 - Export the Trace (sketch)

Delete the image in the drawing first, and then use the "Download As SVG" option in the file menu to get an Scalable Vector Graphics file that Autodesk 123D or TinkerCad can import. Both accept that file format, but I found TinkerCad sometimes has issues importing - not something I have solved yet - but give it a try and comment here if you have issues.

Step 6 - Import the Sketch

In your 3D Modeling app, import the SVG. In Autodesk 123D Design, it is in the main menu as "Import SVG..." / "As Sketch". In TinkerCad, it is in the right side menu under "Import" - and for TinkerCad, it automatically takes care of the next "Extrude" step for you. Make sure at this point you re-scale the sketch to be the size you want to print. I found that sketches come in quite large and need extreme reduction.

Step 7 - Extrude the Sketch into an object

You should be able to select the inside area of the sketch and then use the Extrude command to expand it into a 3D object. You can make it whatever height you want, but I used 3mm to keep it small.

Step 8 - Export the object and Print it

Use the export command to create the STL file to be printed. On my Polar3D printer, this is the simplest thing, since I can send the STL directly to the printer through my browser. On my other printer, I have to first "Slice" the STL to create a printable file.

In my experiment, I sketched, modeled and printed a 50mm long, 20mm wide and 3mm high model of the state of New Jersey. Notice also, that I put a hole in my model to be useful as a backpack trinket or keychain - something I do in most of my models.

Aug 27, 2015

3D Printing from 37,000 Feet. Mind Blown.

I know. If you can do it on the web, you can do it from anywhere.
But still... This blew my mind somehow.

My recent post about 3D Printing from a chromebook outlined how all the apps necessary for 3D Printing are available and accessible online - from the web - from your browser - from your chromebook. So of course, in theory, if I have WiFi on a flight from San Francisco to NYC, I should be able to 3D Print something from 37,000 feet while flying. AND, I should be able to write this blog post too from this flight - which I am doing.

I know, it's obvious. But still!

I did it. I found a model (STL file) I had created previously (yes, of course I could have modeled something new from up here using TinkerCad or something else).  I logged into the Polar3D Cloud Service and clicked on my friend's printer. I could see her printer was on and ready, because I could see the printer's built-in webcam. I also used rule #1 when printing to someone else's printer (yes, common courtesy) and texted her to let her know i was about to print. She of course said "go for it!".

I clicked start and watched as a 3D printer on a desk in California started printing something I wanted printed while I was at 37,000 feet in the air.
Then I wrote this blog post (still flying).
Then I tweeted about it (still flying).
Then...

Mind blown.

Aug 25, 2015

3D Printing with a Chromebook (or just a browser)

Given the prevalence of Chromebooks in schools, and the momentum with 3D Printing as a school science activity, it seems logical that people would ask "How can we do 3D Printing with just Chromebooks?". Here's some ideas for tools that will all work on the web - on your Chromebook (or in your other computer's browser with no downloaded software).

3D Printing is not just Printing


First, it's important to know the main activities involved in 3D Printing - because it's not just about the actual printing. In fact, as I've said many times before, the printing is only a small part of the fun and learning! The steps in 3D Printing include:


  1. Planning
  2. Designing & Sketching
  3. 3D Modeling
  4. 3D Printing


(Advanced Note: Because I'm covering web-based 3D Printing using Chromebooks, I'm leaving out a step which might otherwise be important if your printer's software requires it - that is "Slicing". Slicing takes a 3D Model in the form of an STL file (in most cases) and translates it to something the 3D Printer will understand - something called GCode in most cases. The web based printing solutions I cover do not require this step explicitly - as the printer software directly takes STL object files.)

Planning


Deciding what you're going to print is a great first activity which most people seem to skip over - they're just too excited to start printing ;).  Get in the habit of keeping a list of ideas and pictures that inspire you - especially when someone says "I just need something that does <insert problem to be solved>" - you should be ready to say "I can make you one of those!". But write it down on your list. Here are the tools I use to keep my ideas:

Google Drive or Google Docs - Collecting images. Simply taking pictures of real objects and collecting them in a document or shared folder is another great option. Using the Google Docs app on your Android or iPhone is a sneaky way to call it a Chromebook solution, since you can collaborate in real time and see the collection of images on the Chromebook as they are taken (Teachers: send your class out to take the pictures while you sit back and watch what they've collected on your Chromebook).

Google Keep or Google Docs - Collecting ideas. I use Keep or Docs, both of which work great on mobile and on the web, to keep a running list of ideas that pop into my head while I'm doing everyday things.

Designing & Sketching


Drawing two-dimensional images of what you want to build is a great way to start. You don't even need technology at this stage - colored pencils, markers and a note pad work just fine. But if you're not confident in your skills as an artist, and assuming you are ready to start digital (why else would you have come to this post?), I suggest:

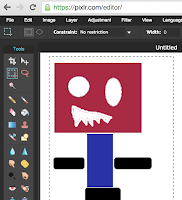
Pixlr Editor from Autodesk - Drawing online. A full toolbox of beginner and way-way-advanced drawing and image editing tools. This might be more than you need, but Pixlr is my go-to image editing app on my chromebook. Also - Pixlr is a a "Google Drive App" - meaning you can add the app to Google Drive so it shows up in your "NEW" choices when you want to create a new image/drawing.

Google Drawings - Drawing online. A great simple drawing tool with plenty of features for early design. Freehand drawing is hard on a laptop - but using the polygon or curve tool lets you draw one point at a time. You can also insert images and trace over them to get really good shapes for later use directly in your 3D Modeling process. I wrote a post about the usefulness of that feature, making it easier to go from flat ideas to 3D objects.
There's lots of options on iPads and Android tablets/phones too - just search the app store for drawing apps and get a highly rated free one to start - but this post is about Chromebooks - so don't expect any help from me this time ;)

3D Modeling


There are several really great web-based 3D Modeling apps that are powerful and well-suited for Chromebooks (or on your web browser on a Mac or Windows laptop). I'll just cover a couple here to get you started.

TinkerCAD (Autodesk) - super easy to start using and has both simplistic beginner tools and some powerful features once you become more proficient in 3D Modeling. I see most middle-schools using this product on chromebooks and desktops browsers and I've even seen (blog posts of) kindergartners successfully modeling objects and printing them using TinkerCad. The most interesting part of TinkerCAD for younger modelers is the ability to easily add all sorts of pre-made shapes into your models. It makes it fast to get going and give a sense of early accomplishment. The integration of Tinkerplay "kits" is also fun to make the parts you print become more interactive as physical building blocks. TinkerCad has all the useful download formats to make it easy to 3D Print - including STL and OBJ formats.

MakeThingsNow.com/beta - If you've played MineCraft, you'll really relate to this block building approach to 3D Modeling.
In fact, the main site for MakeThingsNow lets you pull in your MineCraft worlds and objects to manipulate and print them - but the part of the site I tried was just the "build from scratch" beta app that works really well on Chrome and Chromebooks. You can work in 1x1x1mm cubes or 3x3x3mm cubes or wedges (which are half the volume of the cubes) and it's super easy to place or remove blocks from your creation. Blocks are placed on a pre-defined grid which makes it even easier since it removes all the need for fine alignment and precision required in most 3D modeling. It's also super easy to download the STL file which can be sent for printing. You don't even have to create an account to use this app. From modeling to finished print took about 10 minutes using MakeThingsNow.com and my Polar3D cloud printing (see below).

3D Printing


There are basically two ways to get models 3D printed.
First, you can have someone else print it for you through a service. You upload a model and either a company with lots of printers prints it for you (like Shapeways), or someone who has a printer as part of a community accepts your project and prints it for you on their printer (like 3DHubs).
Second, you get your own printer and print things yourself. That's the scenario I'm mostly covering here - but with web-based 3D Printing using a chromebook there is some overlap in these options, where some cloud-based solutions allow you to connect your own printer AND they provide a community of people who have connected their printers who might print objects for you.

Traditionally, 3D printing required direct connectivity to the printer (from your computer) or required the transfer of 3D Models to the printer using an SD card or USB connection. The idea of printing "from the cloud" - that is direct from the web - while obvious for other things these days, is just starting to take hold and creating what I feel is a minor revolution in 3D Printing. In my experience of using both schemes, printing direct from the web to a web-connected 3D Printer will become the norm - simply due to convenience. Perhaps, printing from a Chromebook today is a window into the future.

3D Printer OS - You can connect your own printer to this service and then print to it from any web-connected device - including, of course, your chromebook. This service has begun to form a web of connected 3D Printers - supporting more than a dozen printer types - which then lets people offer their own connected printer as a service to others. This, like 3D Hubs, makes 3D Printing available to people without 3D Printers. From their web interface you can upload, slice and print your 3D Models directly to your printer, see your history of printing, access Google Drive, Box and other online services to find your 3D Models, and lots more.

Polar3D Cloud - Polar3D makes a 3D Printer which is simple, small and priced right (especially for educators). I reviewed this printer in a prior post, but part of the convenience of this printer is the cloud service which lets you send 3D objects (STL files) directly to your printer. In addition to that convenience, the printer has a built-in webcam which lets me watch my printer from my chromebook or any browser, see the history of prints, watch all the printers I'm signed up to use at once and even watch an automatic time-lapse video of every print! I can also invite other people to join my "club" and either see or even use my printer remotely. think this company is ahead of the curve with this approach, which is why I am optimistic about 3DPrinterOS, which makes a service with some of these features available across many printer types.

I expect to discover many more web-based, Chromebook friendly 3D Printing services and web apps often - so think of this list as a starting point and please share your discoveries here in the comments or by pinging me on Twitter.

Aug 16, 2015

10 things to know when you know nothing about 3D Printing

Most people I know have never even seen a 3D printer and ask me "what is 3D printing? How does it work?" and similar basic questions - so I thought I'd share what I usually tell my friends as I give them a demo of my printers in action.
Remember - this is for newbies - so if you've already been 3D printing, this post might be too basic for you. I'm just trying to keep it all super simple, sticking to the basics for people who know nothing yet, so I'm leaving out lots of gory, boring details.

1 - How does a 3D printer work?

3D printers are sort of like ink-on-paper printers, but they use plastic (mostly) instead of ink and they don't print on paper - also they print in three dimensions instead of two. (ok, I guess that makes them nothing like ink-on-paper printers at all - but you get the idea). They pull the plastic, or whatever material you are using, into a heated nozzle, melt the material at high temperatures (e.g. 180C to 250C for common types of plastic) and then squirt it back out in tiny amounts, layer by layer to form a new 3D Object as the material re-dries and hardens almost immediately.

2 - What is the material used to make the 3D Objects?

The most common materials used in home/school 3D Printers are two types of plastic - PLA (easiest) and ABS (harder to work with). There are many other materials besides plastic which are beginning to become more prevalent, like nylon, rubber (e.g. Ninja-Flex), even wood and more. Some of those materials require different "extruders" (the part of the 3D Printer which melts and squirts back out the material) and even different types of treatment on the "Print Bed" (the place where the 3D Model is formed) to make sure the model sticks and stays in one place while it is printing. If you want a model printed in more advanced materials - like metals - you can send them to services such as Shapeways, where they charge a fee to print and even let you sell printed versions of your models.

3 - How does the printer know what to print? 
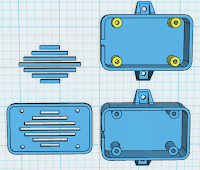
The objects printed are 3-Dimensional models which are created using computer software. These models are simply files which can be shared and have common formats which 3D printers and 3D printing apps know how to handle. The most common of these common formats are .STL and .OBJ files - and many current printers require these to be converted into another common format (.gcode) which tells the printer exactly how much plastic to squirt out, and how to move along the x, y and z axis to make the object form layer by layer.

4 - Where do the 3D objects come from?
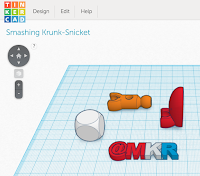
3D objects (more officially called 3D models) are made in two general ways. First, using 3D Modeling software, like TinkerCAD or Autodesk123D Design, you can create 3D objects in a virtual workspace - similar to how a drawing app works, but more complex, since you have to work in three-dimensions. Second, real life objects can be scanned using cameras or specialized object scanning hardware and software (like Autodesk 123D Catch) to create a digital representation of the three-dimensional object.  You can make your own 3D models using either of these methods.

You can also get models made by someone else on community sites like YouMagine, Thingiverse, Pinshape, MyMiniFactory and others (lots of others). Most people I know with 3D Printers actually do more printing of other people's models rather than making their own - but I strongly prefer making my own, as I love to invent new things.


5 - How long does it take to print something?

The extruder on the Lulzbot TAZ4
The time to print is very dependent on many variables. First, the size of the object. Most 3D printers can only print things that are somewhere between the size of a guitar pick and the size of a medium-sized flower vase. The guitar pick might take just 2 minutes to print, while the vase might take 10 hours. If the vase were solid (right, it couldn't hold flowers if it were solid - this is just an imaginary scenario ;) it might take 30 hours to print! Second, the speed of the printer itself matters - and it can be adjusted for each print through the software. Third, the quality of the print impacts the time to print. Higher quality usually takes longer, as the layers are more fine-grained and slowing the printer down often increases the quality of the finished product. For most simple prints that I make in the size range of 4"x4"x4", it takes about an hour to complete, as a rough, rough estimate.

6 - How much does the printer and the plastic cost?

A home or school 3D Printer will generally cost anywhere from $300 to $3000 - yes a wide range. There are also 3D Printer kits if you're into DIY projects, which saves some money but introduces risk of doing something wrong. As with most hobbies, the more you spend, the more you get - higher quality, bigger build size, better features, etc. The "build size" is one of the key differentiators which might make you want to spend more if you expect to print bigger things. Other features which seem to impact cost are generally technical-sounding. Be sure to ask most 3D Printer companies about Educator pricing if you are a teacher or administrator or are buying for a school. Polar3D, for example, sells their printer currently for $799 - but only $599 for educators (25% discount).The plastic used for 3D printing costs about $20-$30 per pound - and you get LOTS of prints out of a pound of plastic. The tiny-sized M3D Printer only costs $350 currently, but you'll give up build size and speed.
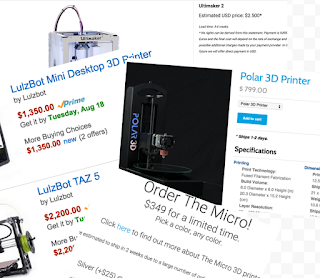
7 - Where do you buy a Printer and the Plastic?

Online is the best bet for buying printers and materials. Amazon of course is a good start, but if you know which printer you want, you can typically buy direct. 3D Printing has not yet been "won" by a few large companies, like HP or Dell - it's mostly smaller companies like AlephObjects (makers of the LulzBot), MakerBot, and hundreds of others.
The plastic used to print is a bit easier, but there are also many many suppliers. You just need to know the "diameter" (1.75mm or 3mm are the most common options), the Type (PLA and ABS are the two most common, although many more types are popping up), and the Color. Again, start at Amazon to play it safe, but I've found that the printer manufacturer itself is usually the nest source for plastic for a given printer.

8 - What's the best way to get started in 3D Printing?

Don't buy a printer as your first step! This is my most important tip. You do NOT need a 3D printer to get started in 3D printing. You should first get started in 3D Modeling. Learn how to create 3D Models using something simple like TinkerCAD. If possible, then find someone with a 3D Printer and get them to print one of your models for you - or locate the nearest Maker Space, Library or School which has a 3D Printer and satisfy your curiousity. Yuo can even use online services such as 3DHubs or 3DPrinterOS to find a person with a 3D Printer nearby you who is willing to print things for you. And, of course, Shapeways and MyMiniFactory are professional services which can print for you. Once you know you want to keep going - THEN, buy a printer.

9 - What software/apps do I need to get started with my own printer?

Software: Generally, printers come with, or suggest where you can get, the necessary software to run the printer. Most printers do require you to "Slice" your 3D objects using an app called "Slicing software" - which turns the object file into something the printer can understand (.gcode, mentioned earlier, sort of like turning a document into a PDF). CURA and Slic3r are a couple of the mosr popular slicing apps. Slicing just means determining how each layer of plastic will be printed - layer by layer and it's a complication that I expect will soon be much better built into the printing process. Several 3D Printer companies have already begun to simplify this process - such as Polar3D - by including the slicing software and process in their printers - so you just give the printer an object (STL format) and it prints it.

10 - What else will I need to get started with my own printer?


Hardware: Depending on your printer type, you might need a Mac or Windows computer to run the software - but using something like a Polar3D printer, or a printer connected to 3DPrinterOS, you can use any web browser, and therefore, a Chromebook (very good for schools). For some printers, you might want an SD card to load models directly into your printer or USB or Ethernet cables if that's the recommended connection to print.
Tools: There are just a few tools that you'll need, and the 3DPrintingForBeginners.com blog has a great post to describe some ideas. Some of the tools needed are very dependent on what type of printer you get - so I won't go into that detail in this post (yes, another draft post is in the works on this)
Workspace: I recommend having a well-lit, out of the way, clean workspace where it is ok to generate some noise and some minimal mess (not much with most printers).