Showing posts with label Google Docs. Show all posts

May 13, 2016

3D Printed Logo for Google Keep

My newest favorite Google app is Google Keep.

It's a quick scratch pad, list keeper, note-taker, image-grabber, doodle-maker, even voice-note-taker app. It's fast and it works on every device where I need it - my phone, my kid's iPhones, and the web - and it lets you share notes with other people.

Google Keep is perfect for that shared grocery list or those quick meeting notes, or that inspirational idea keeper...

But wait - this is not an app review - this post is about the Google Keep LOGO.

Design Goals


I was simply looking to represent yet another Google app logo in a form which could be used as a key-chain or backpack charm. I've done this, as you probably know, with a few other Google Apps, so it seemed fitting to now do Google Keep, since I use the app more than once a day.

The Google Keep logo is a light bulb on a small note pad looking base with one corner turned up. One of the goals of all these logo models is to keep them simple so they print easily and quickly. In the case of the Keep logo, I had a couple of options.

The base was easy, but my options for the light bulb seemed to be either to make it just a cut out into the base, or to make it stick out vertically from the base.

Design Process


The individual parts which make the bulb and base
I started with the easy part - the base. This was a variation on the Google Docs, Sheets and Slides base - that is, a rectangle (square in this case) with a turned up corner. I did the same thing as before, creating the square foundation at about 40mm square and 4mm high, then cut off one corner and rotated it about 135 degrees to appear to be turned up.

To make the bulb, I connected a round sphere to a cylinder. I then created a smaller cylinder at the bottom of the first to represent the bottom part of the electrical connection on a light bulb. I also cut a small gap about halfway down the larger cylinder to create the slight horizontal line that the logo has. I did this using a narrow, wide cylinder and then using the subtract tool to cut it out of the longer cylinder.

Now, I had to try two variations.

On the first, I simply subtracted the whole bulb shape from the base to leave a cut-out in the base in the shape of a light bulb.

On the second, I also cut out the light bulb shape from the base, but I made that cut-out slightly larger than the bulb and placed the original bulb centered in the middle of that cut-out. I then created a simple cylindrical connector to attach the bulb-base to the logo base - so the light bulb would be connected but still appear to be floating.

On that second variation - which looked quite good - I simply had to flatten the back side of the rounded bulb so that it would lay flat on the print bed along with the logo base. I only realized this after trying to print once and having a slightly artistic looking failed result ;)

The Model


This is the first time I created a logo model with two variations - but I like them both, so I'm posting both here.

The first is the cut-out light bulb.

The second is the floating light bulb.

Both models are HERE.

Hope you print lots of these for the Google Keep app users you know!


Dec 23, 2015

3D Printing Chinese Characters

My son is learning Chinese as a freshman in high school. For the holidays, he wanted to give a personalized gift to a friend who is also taking Chinese - so he decided a 3D Printed version of her name in Chinese would be worth a try.

Design Goals


The goal is to create an object - basically a name tag or placard - which will stand up on a desk. In this case, my son said he wanted each character to be it's own distinct object. This was a pretty basic idea - one which we've covered mostly in a prior post about 3D printing text - using extrusions of english text.  But what if the language or characters you want to print are not available in the text objects of your 3D modeling tool?

Design approach


I decided the best bet would be to use the "tracing" method with Google Draw to trace over the characters - creating sketches of each character, then extruding them into 3D objects. This is super easy once you can get an image of the characters into Google Draw. My son did this part by changing his keyboard language to Chinese, using Pinyin to enter the words he wanted, then using a text object in Google Draw.

Once the characters were on the drawing canvas, I basically just traced over them using the Polyline tool. Then, once the whole thing was traced, and after deleting the text object, I use the "download as SVG" option to get something my 3D Modeling tool can import (Autodesk 123D and Tinkercad both support .SVG files).

The Challenge


The name we were creating - Wang May Hua (in english) - is actually three individual characters (in Chinese) - but two of them were multi-part characters with parts which were not physically connected. Here was he main challenge - and basically I referred to all the learnings in my "3D Printing Text" post to make this work.

the two part character connected using small rectangles
I decided the end product should be the individual characters - in their positive form rather than negative subtractions from a block - standing up on a base. That dictated what process to use to connect the individual parts of each character.

Making it work


To connect the individual parts of each character I placed a small rectangle connecting the parts, but offset it 2mm lower than the surface of the characters so that it was less obvious.

To make the characters stand up, I added a base that stood out in front of the characters - about double the thickness of the characters - so my 5mm thick characters had a 10mm thick base, which when stood up would only be 3mm high.

The result came out quite nice - and while I started with objects which are only about 30mm x 30mm, my son is hoping we can "print these now around 10 times that size!". I guess that's a good sign.


Oct 16, 2015

3D Printed Plaques Are Fun Personalized Gifts

This past summer, one of the products I worked on at Google hit a milestone - Google Spreadsheets turned 9 years old on June 6. More significantly for me, that exact date marked the 10th anniversary of our team joining Google.

I decided this milestone was worthy a big #3DPrinted Google Spreadsheets icon with a personalized message for the awesome people I worked with on day one and still work with at Google after all these years today.

I took the original Spreadsheets icon model and simply scaled it up - way up. It went from 4cm high to 12cm high by 9 cm wide by 2 cm deep.

Then I added extruded text - and since this would print on it's back, I didn't worry about the letters sticking pretty far out.

It stands up on the desk and that's pretty much it. The personalization is what makes this fun and relevant. Otherwise, it's just for show - just like real plaques! ;)

Aug 28, 2015

3D Print Your U.S. State in 15 minutes

When you want to 3D print something, first you have to 3D model it, or find a 3D model that someone else made. I was thinking up projects for kids in school, and thought geography would be fun - perhaps to make 3D models of their country or U.S. state - to show off as a backpack charm or to use as a physical model in lessons.

Of course there are some U.S. State objects already modeled on Thingiverse, but not much on Pinshape and others - and besides, half the fun is in the modeling. So I wanted to share how I pursue a project like this to get it done literally in 15 minutes - INCLUDING print time (if I make it small enough). Note - if you live in Wyoming, Kansas or other mostly rectangular shaped states, this is more like an 8 minute printing-only project ;)

Summary

You will trace an image of the object (state or country) using Google Draw (as outlined in a prior post) and then import that into your 3D modeling app to make it 3D ("extrude" it) - then send it to your printer for printing. Easy peasy.

Step 1 - Find an image to "trace"

Go to Google Image Search and find an image of the object you want to model. In my case it is the state of New Jersey. Download that image for temporary use (which you will later completely delete). I use something from an official .gov site that I'm sure provides free access with no copyright restrictions for my use.

Step 2 - Open Google Drawings

Go to http://drawings.google.com while signed in with your Google account and it takes you immediately to a new drawing canvas. You can also go to Google Drive and use the NEW button - and under "More" is Google Drawings.

Step 3 - Import the image for tracing

Use the Insert Image button and import the image that you saved in step 1.

Step 4 - Trace the image

Use the "Polyline" tool (in the dropdown icon where the "line" tool is shown). and slowly create line segments around the outer edge of the image you are tracing. I suggest zooming in pretty far and not trying to get too detailed, as much of the detail will be lost in a 3D print of manageable size. If your line stops extending, just start a new segment at that last point and later group all the lines into one object.

Step 5 - Export the Trace (sketch)

Delete the image in the drawing first, and then use the "Download As SVG" option in the file menu to get an Scalable Vector Graphics file that Autodesk 123D or TinkerCad can import. Both accept that file format, but I found TinkerCad sometimes has issues importing - not something I have solved yet - but give it a try and comment here if you have issues.

Step 6 - Import the Sketch

In your 3D Modeling app, import the SVG. In Autodesk 123D Design, it is in the main menu as "Import SVG..." / "As Sketch". In TinkerCad, it is in the right side menu under "Import" - and for TinkerCad, it automatically takes care of the next "Extrude" step for you. Make sure at this point you re-scale the sketch to be the size you want to print. I found that sketches come in quite large and need extreme reduction.

Step 7 - Extrude the Sketch into an object

You should be able to select the inside area of the sketch and then use the Extrude command to expand it into a 3D object. You can make it whatever height you want, but I used 3mm to keep it small.

Step 8 - Export the object and Print it

Use the export command to create the STL file to be printed. On my Polar3D printer, this is the simplest thing, since I can send the STL directly to the printer through my browser. On my other printer, I have to first "Slice" the STL to create a printable file.

In my experiment, I sketched, modeled and printed a 50mm long, 20mm wide and 3mm high model of the state of New Jersey. Notice also, that I put a hole in my model to be useful as a backpack trinket or keychain - something I do in most of my models.

Aug 25, 2015

3D Printing with a Chromebook (or just a browser)

Given the prevalence of Chromebooks in schools, and the momentum with 3D Printing as a school science activity, it seems logical that people would ask "How can we do 3D Printing with just Chromebooks?". Here's some ideas for tools that will all work on the web - on your Chromebook (or in your other computer's browser with no downloaded software).

3D Printing is not just Printing


First, it's important to know the main activities involved in 3D Printing - because it's not just about the actual printing. In fact, as I've said many times before, the printing is only a small part of the fun and learning! The steps in 3D Printing include:


  1. Planning
  2. Designing & Sketching
  3. 3D Modeling
  4. 3D Printing


(Advanced Note: Because I'm covering web-based 3D Printing using Chromebooks, I'm leaving out a step which might otherwise be important if your printer's software requires it - that is "Slicing". Slicing takes a 3D Model in the form of an STL file (in most cases) and translates it to something the 3D Printer will understand - something called GCode in most cases. The web based printing solutions I cover do not require this step explicitly - as the printer software directly takes STL object files.)

Planning


Deciding what you're going to print is a great first activity which most people seem to skip over - they're just too excited to start printing ;).  Get in the habit of keeping a list of ideas and pictures that inspire you - especially when someone says "I just need something that does <insert problem to be solved>" - you should be ready to say "I can make you one of those!". But write it down on your list. Here are the tools I use to keep my ideas:

Google Drive or Google Docs - Collecting images. Simply taking pictures of real objects and collecting them in a document or shared folder is another great option. Using the Google Docs app on your Android or iPhone is a sneaky way to call it a Chromebook solution, since you can collaborate in real time and see the collection of images on the Chromebook as they are taken (Teachers: send your class out to take the pictures while you sit back and watch what they've collected on your Chromebook).

Google Keep or Google Docs - Collecting ideas. I use Keep or Docs, both of which work great on mobile and on the web, to keep a running list of ideas that pop into my head while I'm doing everyday things.

Designing & Sketching


Drawing two-dimensional images of what you want to build is a great way to start. You don't even need technology at this stage - colored pencils, markers and a note pad work just fine. But if you're not confident in your skills as an artist, and assuming you are ready to start digital (why else would you have come to this post?), I suggest:

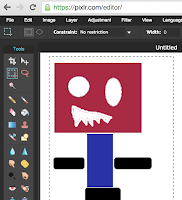
Pixlr Editor from Autodesk - Drawing online. A full toolbox of beginner and way-way-advanced drawing and image editing tools. This might be more than you need, but Pixlr is my go-to image editing app on my chromebook. Also - Pixlr is a a "Google Drive App" - meaning you can add the app to Google Drive so it shows up in your "NEW" choices when you want to create a new image/drawing.

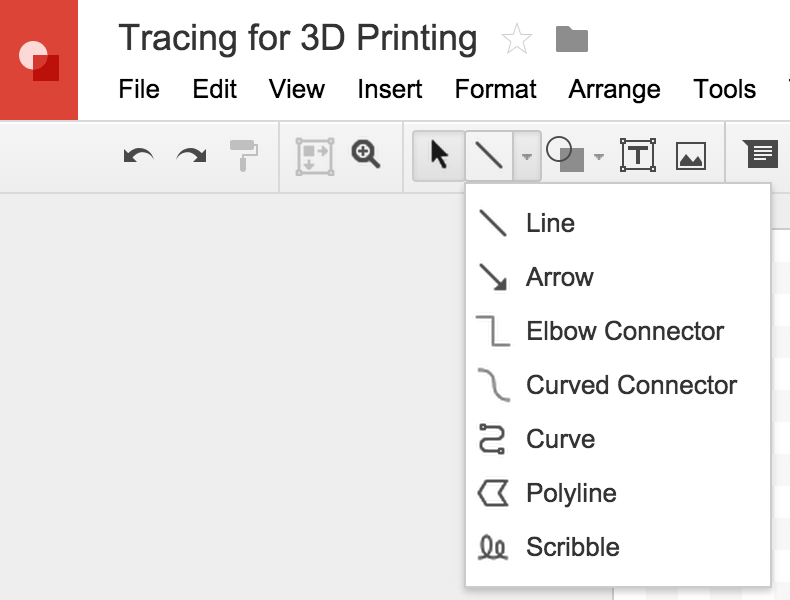
Google Drawings - Drawing online. A great simple drawing tool with plenty of features for early design. Freehand drawing is hard on a laptop - but using the polygon or curve tool lets you draw one point at a time. You can also insert images and trace over them to get really good shapes for later use directly in your 3D Modeling process. I wrote a post about the usefulness of that feature, making it easier to go from flat ideas to 3D objects.
There's lots of options on iPads and Android tablets/phones too - just search the app store for drawing apps and get a highly rated free one to start - but this post is about Chromebooks - so don't expect any help from me this time ;)

3D Modeling


There are several really great web-based 3D Modeling apps that are powerful and well-suited for Chromebooks (or on your web browser on a Mac or Windows laptop). I'll just cover a couple here to get you started.

TinkerCAD (Autodesk) - super easy to start using and has both simplistic beginner tools and some powerful features once you become more proficient in 3D Modeling. I see most middle-schools using this product on chromebooks and desktops browsers and I've even seen (blog posts of) kindergartners successfully modeling objects and printing them using TinkerCad. The most interesting part of TinkerCAD for younger modelers is the ability to easily add all sorts of pre-made shapes into your models. It makes it fast to get going and give a sense of early accomplishment. The integration of Tinkerplay "kits" is also fun to make the parts you print become more interactive as physical building blocks. TinkerCad has all the useful download formats to make it easy to 3D Print - including STL and OBJ formats.

MakeThingsNow.com/beta - If you've played MineCraft, you'll really relate to this block building approach to 3D Modeling.
In fact, the main site for MakeThingsNow lets you pull in your MineCraft worlds and objects to manipulate and print them - but the part of the site I tried was just the "build from scratch" beta app that works really well on Chrome and Chromebooks. You can work in 1x1x1mm cubes or 3x3x3mm cubes or wedges (which are half the volume of the cubes) and it's super easy to place or remove blocks from your creation. Blocks are placed on a pre-defined grid which makes it even easier since it removes all the need for fine alignment and precision required in most 3D modeling. It's also super easy to download the STL file which can be sent for printing. You don't even have to create an account to use this app. From modeling to finished print took about 10 minutes using MakeThingsNow.com and my Polar3D cloud printing (see below).

3D Printing


There are basically two ways to get models 3D printed.
First, you can have someone else print it for you through a service. You upload a model and either a company with lots of printers prints it for you (like Shapeways), or someone who has a printer as part of a community accepts your project and prints it for you on their printer (like 3DHubs).
Second, you get your own printer and print things yourself. That's the scenario I'm mostly covering here - but with web-based 3D Printing using a chromebook there is some overlap in these options, where some cloud-based solutions allow you to connect your own printer AND they provide a community of people who have connected their printers who might print objects for you.

Traditionally, 3D printing required direct connectivity to the printer (from your computer) or required the transfer of 3D Models to the printer using an SD card or USB connection. The idea of printing "from the cloud" - that is direct from the web - while obvious for other things these days, is just starting to take hold and creating what I feel is a minor revolution in 3D Printing. In my experience of using both schemes, printing direct from the web to a web-connected 3D Printer will become the norm - simply due to convenience. Perhaps, printing from a Chromebook today is a window into the future.

3D Printer OS - You can connect your own printer to this service and then print to it from any web-connected device - including, of course, your chromebook. This service has begun to form a web of connected 3D Printers - supporting more than a dozen printer types - which then lets people offer their own connected printer as a service to others. This, like 3D Hubs, makes 3D Printing available to people without 3D Printers. From their web interface you can upload, slice and print your 3D Models directly to your printer, see your history of printing, access Google Drive, Box and other online services to find your 3D Models, and lots more.

Polar3D Cloud - Polar3D makes a 3D Printer which is simple, small and priced right (especially for educators). I reviewed this printer in a prior post, but part of the convenience of this printer is the cloud service which lets you send 3D objects (STL files) directly to your printer. In addition to that convenience, the printer has a built-in webcam which lets me watch my printer from my chromebook or any browser, see the history of prints, watch all the printers I'm signed up to use at once and even watch an automatic time-lapse video of every print! I can also invite other people to join my "club" and either see or even use my printer remotely. think this company is ahead of the curve with this approach, which is why I am optimistic about 3DPrinterOS, which makes a service with some of these features available across many printer types.

I expect to discover many more web-based, Chromebook friendly 3D Printing services and web apps often - so think of this list as a starting point and please share your discoveries here in the comments or by pinging me on Twitter.

Feb 17, 2015

Use Google Drawings to start a 3D Model

If you want to start 3D model from a custom graphic, logo or photo, you'll find that most 3D Modeling apps don't let you import an image to trace. Apps like Autodesk Tinkercad or 123D Designer allow importing of Scalable Vector Graphics (SVG) format files, but most people have not even heard of SVG, let alone know how to generate one from an image they have.

Watch the video (embedded above) for a 3 minute lesson on how to do this - and read on for some details.

Use Google Drawings - or Google Slides - to create SVG

If you create a drawing in Google Drawings or Google Slides, you can export an SVG format of that drawing for use in a 3D Modeling app! While Drawings and Slides don't have all the pro tools some experts might expect in a product like Adobe Illustrator, they are much easier to use and allow for something that I've found to be quite handy - that is, tracing an image to create the beginnings of a 3D Model. Go to Google Drive and click the NEW button (it's a CREATE button if you're still using the old Drive interface) and then select Google Drawing, which might be under "more" if you don't use it often. That will take you to a blank page to start your drawing.

Trace an image to create SVG

To trace an image as the basis for your eventual 3D model - use the INSERT / IMAGE feature to grab the image you want to trace. Of course, you could just draw using the shape and drawing tools, but if that's all you wanted, you may as well have started in your 3D modeling app. Once the image is there on your canvas, scale it to a workable size. Now, use the line tools to trace it. I like the Curve and Polyline tools for this. Just start at any point on the edge of the object you are tracing and click as you form lines until you can create a closed shape around the object. Use ESCape to end or stop if you make mistakes. When you are done tracing, click off the trace and click the underlying image and delete it.

Download as SVG.

In the FILE menu of Google Drawings is the "DOWNLOAD AS..." option. Use that and select "Scalable Vector Graphics (.svg)" option. That will download the file to your machine - usually into the "downloads" directory.
Import the SVG file into your 3D Modeling App
Depending on what 3D modeling app you use, there will be some "IMPORT" or "OPEN" command which will ask you to pick the file to upload. Navigate to the directory which contains the .svg file you saved and import it. From there, you should know how to "extrude" that into an object in your 3D modeling app. I use Autodesk 123D Designer mostly, and this process is extremely easy.

Watch the video in this post to see the whole process.

Feb 2, 2015

3D modeling Google Slides icon

Once I completed the Google Docs icon and Google Sheets icons in 3D, I had no choice but to do the 3rd in the series - Google Slides.  This one was also a bit challenging in the design department. Turns out a 2D graphic design has many ways to be interpreted in 3D. You can see how I ended up with this one - offsetting the two slide frames by just a bit in the Z-axis (height) and both hollow straight through the print.

I realized that putting these icon models up on Shapeways was a great idea for people who wanted to have these but don't yet have a printer - but that I have to size them properly and separately to be clear what they are getting. I'll get to that some day very soon. Ping me here if you're actually waiting for that or want the model.

Now - You can bet that I'll be doing more product icons - but the most difficult one will be the Google Drive icon - which is 3 colors. I've been working on interlocking parts, which will be necessary for that project - stay tuned. I'll get that done in the next few days (or weeks).

Feb 1, 2015

Lessons from 3DPrinting multiple objects simultaneously

The 4 simultaneous copies being printed
When I started printing these mini-product-logo icons, it seemed sensible to print more than one at a time. The Slic3r App I use for creating 3D Printing gcode (the instructions which the printer understands to control every layer) has this simple "duplicate" button which made it super simple to make a "4-up" version of my model of the Google Forms product icon. BTW, The Google Forms icon was necessary , since I already did Google Docs and Google Sheets - and it was timed to be done while I had green PLA loaded :)

When I printed these - each of which is 30mm X 22mm X 4mm - I had some unexpected quality issues, which I am attributing to the simultaneous multi-item printing method. The issues simply do not occur when I print one at a time. This is a lesson worth sharing.

The Quality issues:

Curled bottoms after printing
  • Curling at the bottom of the models (in spite of a heated bed). I've never had curling on prints before.
  • "Globbiness" (there must be a technical term for this) on some edges which make them stick up or out over the edge.
  • Gaps in the top layers which make the surface not only rough, but look more like a weave than a solid.
Gaps and Globs visible in top layers
I decided to print another version of the model just one at a time - just to be sure that something else didn't change in my printer that I didn't notice. As suspected, the one-at-a-time version came out good again. Flat on the bottom, smooth on the edges and almost no gaps on the top.

COMPARISON - one printed alone, vs. one of the bad 4
Watching the printing process on both versions, I'm concluding the following: With multiple items to print, and the print head doing one layer at a time - doing layer 1 on object 1, then layer 1 on object 2, then layer 1 on object 3, etc - each object layer has too much time to dry and cool before the next layer is extruded on top. That reduces adhesion and the hot layer being laid on a too-cool layer causes the prior layer to pull up a bit. The "globbing" seems to be caused by simply too much movement between objects, whereas when there is one object, the movement of the head is always close by with less starting/sopping on extrusion. The gaps on top I can't explain too well.

I recommend trying multi-item printing in two's - figuring out an optimal level of efficiency without sacrificing quality.
COMPARISON - one printed alone vs. one of the bad 4

Project Details:

Printer:  LulzBot TAZ4
Model:  Google Forms Product Icon
Filament:  LulzBot 3mm PLA Green
Print Time:  4-copies: 85 min. 1-copy: 23 min.

Jan 29, 2015

More Product Icons - Google Sheets

Once I created the Google Docs Logo model, it seemed it would simple to move on to the sibling product logos for Google Sheets, Forms and Slides. In fact, anyone who knows me is shocked that I didn't do Sheets first (since that's where my history with Google products all started...) but, honestly, when I started modeling and printing, I only had blue PLA filament - so I had to wait for green before doing Sheets ;)

I used the Docs logo model as the starting point. That folded corner part is the same - and the dimensions are the same - so I just closed up the holes in that model and started there. It turned out the Docs logo was the simplest by far.

The challenge with Sheets is the "floating" cells - the parts of the graphic version which have no connection to the solid parts. I eventually just decided to invert the graphics - making the spreadsheet cells the holes through the solid and by raising the outline of the columns/rows of the spreadsheet stick up above the surface of the logo to give the cells more relevance.

I printed 3 sizes of this model - Large (200%, which is still only 40mm tall), Medium (150%, 30mm tall) and Small (100%, 20mm tall). The small ones are perfect to make earrings (who would wear those, you ask? Someone on the Google Sheets team, or my daughter, that's who!). The medium sized are perfect for a keychain, and the large as a backpack charm or zipper pull.

3 sizes printed - 100%, 150%, 200%

Project Details

Printer:  Lulzbot TAZ4
3D Model:  Google Sheets Product Icon
Filament:  Lulzbot 3mm PLA Green
Print Time: 100%:13min,  150%:27min,  200%: 45 min.

Jan 26, 2015

Google Docs Icon 3D modeled and Printed


I really don't know why - but I wanted to model and print a Google Docs Icon - you know, that blue paper looking thing, with the folded corner and the simple lines on it. OK - I know why. Because I LOVE Google Docs, Sheets, Slides, etc!
I actually wanted to do the Google Sheets Icon, as my best friends know, since spreadsheets is where the whole Docs thing started, and it's my favorite product of all time. But, I only had Blue PLA filament at the time, so I started with Docs - practicality over passion.

The model was quite simple to make - and I was pretty happy with how the "folded corner" came out. I posted the model on Thingiverse.com so others could use it (but please do not use it for commercial purposes).
If you use this model and print it - please, do it in blue and let me know- I'm @jrochelle on Twitter.

I'd love to see some other Google Docs fans walking around with this hanging from their backpack or key chain... or come up with another great application of this model!

Some Print Details

Filament:  Gizmo Dorks PLA, Blue, 2.80mm (measured, although labelled as 3mm of course)
Model:  Google Docs Icon on Thingiverse
Time to print:  36 Minutes