May 25, 2015

Multi-Color #3DPrinting - using Sharpies (tm)

Most reasonably priced, and many fairly expensive, #3DPrinters print one color at a time - which practically means that most objects you print will be a single color. Boring!

One technical way to get multi-color is sometimes expensive and still limiting - that is to get a dual-extruder, where two colors can be loaded and printed during one print cycle. Our school tech club has a FlashForge dual extruder, and while it's cool, it's still limiting - allowing exactly two colors.

Another way to get multi-color #3DPrinted objects is to design models which are multi-part so that each part can be made in different colors and then connected. This is my preferred method so far - but it is truly hard to design in 3D Modeling software with this in mind.

Of course there are much more expensive printers which achieve not only multiple colors, but even full-spectrum color, like your desktop paper printer does. But with the types of 3D printers that most of us have, I found another, more crafty (some might call it fake) way to achieve multi-color - that is, to print your objects using white filament and then use Sharpie (tm) markers to color the models any way you want. What I like best about this method, is that it requires some good old-fashioned arts and crafts action - drawing with your hands (imagine that!).


I've experimented a bit with this, and so far it works pretty well. Included in this post is a video (quick time-lapse) of me coloring a miniature version of my custom designed Minecraft (tm) TNT block. I found that using Sharpie's for even minor highlights really makes some models look significantly better. When I print that same TNT block in pure red - it's hard to see the letters or the other details, like the fuse on top, which I can now color in black.

My experiment with the Minecraft (tm) sword shown in the images in this post was circularly inspired by my friend Alice Keeler's post where she suggests using spreadsheets as a pixel art creator - and she showed an image of a pixel-art Minecraft sword. I used that design as a guide to try coloring my own #3DPrinted Minecraft Sword... Not too shabby (ok, a little shabby).

The before (white) and after Minecraft(tm) Sword!

More 3D Printed Pegboard Tool Holders

When I originally designed my new peg-board tool holder, I specifically designed it so that it could be expanded later into more tool-holding designs. Making it multi-part not only made it printable without supports, but it made it so that one peg-bard clip could be used for a variety of tool-holders. The first design was made for small cutters and pliers.

Well, I've finally gotten around to expanding into a new tool holder - again inspired by the tools which were simply not finding a happy place to live on the otherwise organized #3DPrinting workbench.

This new design was made specifically for small screwdrivers - or any tool which is elongated, thin and typically too small for a peg-board. I tried not to get too greedy and just made this one with eight receptacles - although I might try a larger model which holds more since these small tools are so lightweight and the holder quickly becomes crowded when full.

There's likely more designs coming in this series, as now I look around and find many special tools which are clearly shaped awkwardly for typical peg-board holders, but would probably fit well with a custom-shaped holder made just for that tool.

You can see in the model pictured above that the clip which fits into the peg-board is generic and can hold many types of holders. The holder design simply needs to incorporate the connector "legs" which stick up from the print bed and print quite easily on practically any #3DPrinter.

Definitely go back and look at the original tool holder to learn more if you are curious about this design.

May 23, 2015

The Tiny $349 3D Printer - first impressions

I've been asked by many people for 3D Printer recommendations for a classroom, or school #MakerSpace. That put me on the hunt for an inexpensive, non-technical, easy to use, space-efficient and reliable printer. At the #3DPrinting show in NYC a few weeks ago I found the M3D Micro 3D Printer - priced at $349 (although the company indicates on their site that the price will soon rise), pre-assembled, small (Micro, actually) and light, and billed as a printer which "can be used right out of the box". One more "important" point: it is so darn cute!

Summary

The M3D Micro 3D Printer is a great starter printer for people looking for low price, small object printing only, space efficiency and simplicity. It often produces good results with simple object models and hides most of the technical details from the user. The M3D is an absolutely miniature cube - measuring about 7.5" in all dimensions - and it looks almost elegant on your desk. It's also not too noisy (compared to other printers). The company offers decent filament (1.75mm) and color choices, and while it seems you're best off buying theirs, for which their printers are pre-programmed to heat and extrude correctly, I suspect using filament from other providers is feasible. In the $350 price range, I think the M3D is a great starter printer.
The main issue I'd like to see resolved (as with all 3D printers) is bed adhesion. I'll continue to look for a recommended solution here - and i'm confident there is one.

There are some things I'm not as happy about, which I've included in a separate section at the bottom of this post - be sure to read those. Overall, in these still early days of #3DPrinting, the M3D hits a hot spot in the market and is a player in that inexpensive, starter printer space. One caveat - I have NOT compared this printer to others in it's class - and there are some that come close to that price point, but not many so focused on non-technical users so far. I suspect there will be many more in the coming year.

Unpacking - Out Of Box Experience

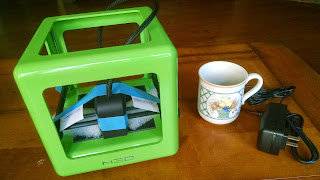
The size and light weight of the box that arrived was shocking. I was sure the 3 rolls of filament I ordered (at $13 per roll) was all I would find inside - but no - the whole printer, assembled, with power supply and 3 rolls of filament was all in that box weighing only about 4.5 pounds! The bright green color of the printer made it a delight to see (they come in several bright colors).

The printer seemed so simple from a mechanical standpoint, that the packaging to secure it was also simple. A bit of blue tape and a couple of plastic holders held things in place and had to be removed before using the printer. Very simple. I found out later that those plastic holders were printed on MY printer as a pre-shipment test run (they should have told me that in the packaging).

Setting Up - Getting ready to print

I clearly got my printer during the early days of M3D's production-delivery business being set up, so you won't experience the piece of paper with super long dropbox URLs to painstakingly transcribe into your browser like I had to endure (that was harder than it sounds). They've moved to short-link URLs (duh).

The main #facepalm horrific moment was discovering that the printer requires proprietary software which, for the moment, is still Windows only. Without a single windows machine in my house, I panicked (overstatement), and after trying to find their Mac Beta software, and hearing that it was not yet stable, I actually went out and bought a super cheap, open-box special, windows machine at Best Buy. While the PC was cheap, this certainly added to my total cost to try this printer. "It better be good" is all I could think.

I installed the M3D software and plugged in the printer. The software quickly identified that my printer needed a firmware update - which finished in just 15 seconds. I did not see any filament hanging out of the hot end, so I assumed there was none and that no test print was done. I followed the directions in the pdf manual online (another looooong URL to type in!) for loading the filament. They have a "filament code" system to make it easy to prepare the printer with the right slicing and printing parameters. In my case (again, accepting that this is just growing pain of a new product) the software first didn't accept codes, and then when I updated it and it did, one of my filament spools didn't have a code. I found my answers online and got back on track.

I was slightly disappointed that "internal filament" was not an obvious choice, as when I saw the printer at the public show, it looked like the filament spool can be loaded under the print bed, making it an even smaller and simpler footprint on the desktop. I left the filament external and moved on.

First Print

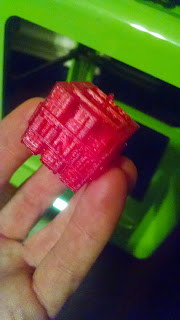
I figured a small, simple model - like my Google Docs Logo keychain - would be good as a test. It's small, and has plenty of bottom surface to adhere to the bed.

First try failed. Turns out there was some filament in the printer - so my loading the new filament wasn't completely successful and the first print had to be aborted when I saw that the first few layers were mostly blank and the filament only started really extruding after layer 6 or so. Good news was that the "abort" button on the M3D software works :)

Second try was mostly a success with one caveat. As in all 3D printing, adhering to the bed is challenging. M3D solves that my printing a "raft" under every print. In fact, the first version of software that I had did not include an option to turn that off (now it does). The Docs Logo model looked great (!) but because of the flatness of the model, I simply could not remove the raft without ruining the object. You can see in the pictures what the result was - as my object split or simply ended up with a very rough bottom.

Second Print and beyond

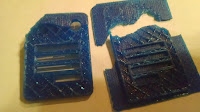
I have a small "link" model that I use for snap-together parts, which is small enough to print fast, but has enough detail to test the printer's capabilities. Here is where I realized some limitations of the printer, at least on the "fast" and "medium" settings. The linkage detail, which makes that object snap together with other objects - requiring accuracy of less than 1mm - simply did not print well enough to be functional. This tiny model also had way too little surface area on the bed, so it came un-done during printing on more than one occasion. I decided to stick to simpler models, and most of these worked pretty well.

Bed Adhesion (of course)

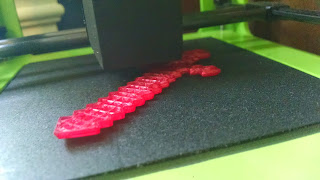
You can see the model separating from the bed
The main issue that I started having is actually no different than the issue I've had printing on my main printer (the super excellent LulzBot TAZ4) - and that is Bed Adhesion. Getting things to stick on the bed is an art (and a science). My only issue on this M3D is that the bed is a unique surface that isn't clear how it should be treated to improve adhesion without ruining the bed surface. I will play with that more for sure - but the company has not yet answered my query on how to do that with care. They clearly prefer a raft (larger bottom layer) to make adhesion work well consistently. Most of my early prints had no issue, but more recently, I've seen peeling at the edges - which you can clearly see in the picture of the Minecraft (tm) sword - so badly on that one that I had to abort it.

Some things I'm less happy about... 

The software is "ok", but not well designed from a user-experience perspective (for example, it doesn't show me how long a print actually took) and has an interface which only a windows user could love ;). The lack of Mac software is temporary, as M3D offered me access to an early test version (not yet stable) - but I expect that will be launched soon. Worth noting for you experienced 3D Printing enthusiasts, the software gives you access to "advanced mode" - but they give a caveat that it may void the warranty. I understand this - but I think it's problematic given the likelihood that many of their customers will be experienced in these early days particularly.

The lack of explanation of how to internally install filament is mostly just disappointing, but it also leaves me without an elegant way to hold my filament externally (there's no spool holder).

The filament itself - at least the blue and red - are somewhat translucent, almost sparkly, which is ok if you want that look, but for a flat solid color, I'm hoping their other filament choices are more opaque.

One important note: The company response has steadily improved over the few weeks I've had this printer, and they've been incredibly honest about their challenges and complete in their followup once they do. I hope they can compete in this incredibly competitive 3D Printer market.


May 18, 2015

Building Bridges on the 3D Printer

Bridge building has been a pretty common topic used in school science and physics lessons over the years - probably because it is a fun way to explore force and weight distribution, even math and material strength. I thought it would be fun to create a 3D Model of a suspension bridge to give science teachers a starting point to combine 3D Printing with these lessons. I also think this world is in desperate need of many more bridge builders, so kids should learn how to build an actual bridge as early in life as possible! (yes, I'm kidding).

The 3D Model - Multi-part again

Given my obsession with multi-part objects, I figured I should also try that here. Actually - the motivation is more of a practical goal of "getting complex things to print". Most 3D Printers still cannot print everything you design so easily - they specifically have issues with something called (ironically) "bridging" - where there is some part of an object which has not supporting material to the ground. In the bridge project - no surprise - there would be a long span which has no support from the bottom. So - printing the bridge in parts (which is actually how real bridges are made, right?) seemed logical and practical.

The Design

I set out to design a suspension bridge which was visually modeled after the Verrazano Narrows bridge, in Brooklyn, NY. This bridge opened in 1964, and has some really interesting facts around it's construction and use (including being the starting point for the NYC Marathon). But I didn't set out to mimic it's relative dimensions - I just estimated by eye what would look good. I decided to construct it in 3 parts - the tall stanchions, the short stanchions and the cables. You can see how some of the parts look on the 3D Printer bed to get a better sense of what the parts are.

The Results

The snap together parts don't work all that well yet - but this first version is just a prototype of something I might make better over time. The scale of it - 2 spans measuring approx 8 inches wide and 3 inches tall - made it difficult to make sturdy. But this first version at least looks pretty good when put together. I will definitely glue it to make it stronger.

Let me know in the comments if you have ideas on how to use this in a real school lesson or how you think I could change the model to make it more useful or interesting. I've got plenty of time to do stuff like that (uh... not really). I'll post this model soon in a place where anyone can download it.


May 13, 2015

Live Broadcasting 3D Printing Projects

Live Broadcasting on Periscope
I've recently started using Periscope - a live broadcasting app which is now owned by Twitter - to broadcast 3D Printing projects as they print, live, to my followers. The Periscope app is so easy to get going, and it runs on a phone (iOS only for now - ugh - so I borrowed an old iPhone to do this). It is super convenient to set up the phone cam in front of the printer without any set up time at all.

Why Broadcast 3D Printing?

The main reasons and benefits to broadcast are simple:

#1 - I can explain 3D Printing live - and get the same effect as if people are right in front of me - something that I've noticed lots of friends and family enjoy when they come over if they have not yet seen a 3D printer live (which most haven't yet).

#2 - I can interact with people via Audio while the video streams.  I don't have to use the keyboard - which is so convenient while printing. People who are watching ask questions about the project being printed via text and I answer on audio. Simple.

#3 - I don't have to personally be in the video at all - the camera is always showing the printer. Of course, there is a "flip to back-facing cam" button if you ever want to be the live reporter, but I haven't used that yet.

#4 - Most Importantly: I can watch MY OWN printer live from another room or even remotely via the web or on the mobile periscope app! This is actually my favorite benefit. I set up periscope, and even if it's boring others to death, I can check in on my printer to see if everything is moving along ok.

#5 - I can save the video to my phone gallery and post to YouTube or edit it. If my explanations to viewers were good, the sound track can even be useful for later instructional videos. The video can also be watched as a replay on Periscope if you follow MkrClub.

I can do something almost exactly the same on Google Hangouts on Air, just haven't yet, but will definitely try that. What I liked about starting with Periscope, is it uses my twitter following to let people know I'm live. I've had as many as 30 or so simultaneous viewers on projects and over a hundred over the course of a single broadcast. I get great response from people when I interact with them live. The most fun part is when friends I know join and ping me while I'm live!


May 12, 2015

10 Ways to Use 3D Printed Alphabet Links in School

Now that I've made the Alphabet Bracelet Links available, I wanted to give teachers a starter list of ideas where they can use this project to help make good use of 3D Printers they may have available at school or a local MakerSpace.

10 Ways To Use 3D Printed Alphabet Links In School

These letter links each print pretty quickly, making them a great in-school 3D Printing project. They also link together, making them great for collaborative projects.
Here are some ideas for how to use them in school:
#1:  Support Your Favorite Cause - instead of just your name, print your school name or mascot, characters from a book, a place you love or a sports team or a charitable organization you support. These make great bracelets!

#2:  Make your own links - Challenge kids to make their own link designs (something other than a letter) using the templates I've provided in the files (see link at bottom of post).

#3:  Design your own connectors - Explain to kids how these links connect (they are a custom designed connector - definitely read the "How These Connect" section) and challenge them to come up with their own ideas for how to create connecting snap-together parts (great for older kids).

#4:  Have kids make gifts for parents, friends or siblings - or for other teachers or kids in a neighboring school or one halfway around the world.

#5:  Design unique projects for a whole bracelet or non-bracelet project (check out the Pi Bracelet for inspiration)

#6:  Color Them - Print these in white filament, and have kids color them using Sharpie (tm) markers. Just because your #3DPrinter might only print one color at a time, no reason to let that squelch creativity!

#7:  Make Lesson Words - Print a whole load of these letter links (abclets) and challenge kids to make words relevant to the current lesson.

#8:  Make Word Games - Print a whole load of these and have the kids play word scramble (each kid grabs 7-10 links and tries to make words).

#9:  Make Non-English Words or Letter Links - let kids in foreign language class make words in other languages or even design new links with non-latin letters (Chinese, Hebrew, Arabic or others).

#10:  Collaborate with other schools - have kids compete to make the longest sentence chain or the prime numbers digit-by-digit (you'll need to model the numbers first!) or some other challenge which they can use to create some friendly competition with other schools.
REMINDER - These links fit together in a unique way, so be sure to read my original post about how these work. Once you get going with some of these ideas, come up with your own ideas and share them here in comments!

Here, again, is the link to the 3D Model Files on Pinshape.com

May 10, 2015

3D Printed Alphabet Bracelet Links

After some experimenting with snap together parts, I came up with a design which works pretty well for bracelets and other small applications. (Links to the model files are at the bottom of this post). I call these abclets.
The personalized bracelets were the hit among young kids like my daughter (who is a 3rd grader) and seemed also to be a great project for in-school printing, since the parts are small and quick to print. I'm making the whole alphabet of links available here and as well as a couple of blank template links which you can use to make your own links.

Printing Notes

These work best when printed at full scale, which is still pretty small - 15mm X 15mm per link on the main part of the link, with a total width of 25mm per link including the linkage parts. That means every two links basically measures 45mm wide since there is overlap of the linkage. It takes about 7-8 links to fit around a small wrist (3rd grader), and 9-10 links for an adult.
I've had pretty good luck scaling these down to 80%, but they fit together very tight at that scale and take much more cleaning up after printing to connect and move loosely as a bracelet.

How The Links Connect

There is a unique, custom connection design used here. The parts can only be connected at a 90 degree angle, which makes them harder to come apart when you're wearing them on your wrist. But to get them together, you have to understand the connector.

Instructions for connecting Snap-Together Parts. Reverse the process to un-snap them.

Using these in School

These Alphabet Links print pretty quickly, making them a great in-school 3D Printing project. One of the most common problems I hear about 3D Printing in school is the time it takes to finish a project and for each kid to finish printing their own object. These letters can be a quick win, giving you the opportunity to print one every 10 or so minutes. Kids can see (and take home!) results on the first day and even team up to finish whole projects rather quickly. Given that the links are made to fit together, it's a great collaborative project too. I'll soon be posting ideas about specific projects you can use these for in school, but until then, share your own ideas by adding here in the comments!

The 3D Models

I have made a separate STL file for every letter. This allows me to quickly gather just the letters I need for a given project into one print project in my slicer software (I use CURA these days). I've also got the whole alphabet here in one STL for those who are ambitious and pretty confident in their printing and actually need all the letters at once. I have yet to print all at once.

>  The whole Alphabet as one .STL File (on PinShape.com)

COMING SOON:
>  Link to every individual letter (so you can just download the ones you need for a given project).

May 2, 2015

#3D Printing Better Pegboard Hangers

The finished product - 2 of them side by side
My 3D Printer is on a basement workbench in front of a pegboard wall. Often, when I reach for a tool, it falls off the pegboard behind my printer due to poorly designed, practically useless, pegboard hooks. They're metal, have no lateral support, and fit too loosely.
I see opportunity.

[update: when you're done reading this post, go read a newer one I wrote which includes links to the 3D STL models]

The Goal

I set out to create better pegboard storage hangers. Something more than that simple hook I found on Thingiverse in the earliest days of having my printer (which was still pretty good, just basic and unexpandable)

I decided to start with hangers for tools which seemed to have almost no good options yet - the many small pliers and cutters that I actually use for all sorts of projects. I've got about 8-10 of these, all shapes and sizes, clippers and pliers. Besides not hanging well on the metal hooks, they take up way too much wall space when hung individually.

The Design

Part 1: the hook which goes into the pegboard.
The design I invented uses space more efficiently by letting the pliers/cutters overlap each other a bit, they let you easily see the tool, so you can quickly grab the right one without the others getting in the way, and it's easy to store or remove a tool quickly. My initial design was going to be a long rack with many slots to hold 5-6 pliers at a time, but then I realized I'd get more flexibility (and a faster print) by modeling a hanger which holds just two tools at a time. They can still be hung against each other to get the effect of the space saving design for 8-10 tools or more, but I like the smaller design for flexibility in setting up the pegboard how you want.

Part 2: The tool holder which fits onto the hook
As with most (all so far) of my designs, I try to avoid overhangs (no printing supports) - and I am actually interested in making complex shapes out of multiple objects which fit together.  I decided in this case to separate the pegboard connection part from the tool hanger part, which will allow me to use the same pegboard connection part for a variety of hanger designs i the future. This worked out great. As you can see from the images, the pegboard insert (Part 1) is a small part which takes less than 10 minutes to print, and the hanger (Part 2) can be easily printed upside down and later adapted to hold all sorts of things. The Hanger took about 40 minutes to print.

Results

The design worked out really well. It is strong, has plenty of lateral support (with those long legs on the hanger which ride along the sides of the hook), and holds the target tools perfectly - small pliers and cutters. It is clear that I'll be able to adapt the hanger design to take many other tools, and use the same hook design.

Here's how Part 2 goes into Part 1

Other Discovery notes:

  • Clearance for parts fitting together requires approx 0.2 - 0.3mm for z-axis height and more like 0.5 - 0.7mm for x- and y-axis widths (see below why these are different)
  • fitting two parts together takes less clearance on z-direction than x or y directions. This is mostly due to the bottom layer of the print having extra width due to first layer squashing. So the width of the part in the x or y direction will always be a bit wider, but the height of the object is as measured in the model - so the fit has plenty of room.
[update: find links to the free model files in a more recent post about this project]

The finished product


The kit - pegboard clip and tool hanger.