Showing posts with label 3D Lessons. Show all posts

Jan 30, 2016

A 3D Printed Filament Spool and a Discovery

I purchased a bunch of PLA filament for my Lulzbot TAZ4 a while back (from Ultimachine.com), and didn't realize until it arrived that I had bought the "Coil" version, instead of "on spool". For the first few months, I rigged up some crazy hanging jig which let the PLA feed out of the bag it came in - looking very much like a intravenous rig used to administer drugs or fluids (analogy un-intended). While this worked, it was wonky and suboptimal.

I decided to use this as an opportunity to design a 3D Printed spool to hold this PLA. I'm sure I could have gone out and bout one, or used the few (actually, just one) spools I have already depleted. But, as we say here at MkrClub, "Any excuse to design something new".

Design Goals


My main goal, of course, was to have something that worked. That meant it had to allow the PLA to be wrapped at a diameter which was loose enough not to snap it, and hold the PLA in place. The spool also had to have the right capacity to hold a full coil of PLA - about 1 Kg - and it should be adequate for both 3mm and 1.75mm PLA.

A close second goal was that the spool should print easily and quickly. I did not want to use tons of plastic printing a spool, and did not expect to just copy the dimensions and design of the standard spool. I expected - as I do so often - to have a multi-part design here.

Design Summary


The core of this design was, well, the core of the spool. I experimented in modeling a bit, and decided to design a hub and spoke model which had very simple and lightweight spokes coming out from the center (the hub). I did not think I needed any "rim" around the outside of the spokes, and that seemed to work just fine.

The spokes were designed as a pair of opposing spokes as a single object - which allowed me to vary the number of spokes used if I varied the size of the core/hob (for larger spools). I started with 4 pairs of spokes per hub, evenly spaced at 90 degree intervals.

Design Challenge


The connection of the spokes to the hub was a design challenge. I considered making each individual poke a separate object, but realized that as pairs they might be easier to connect in a strong way to the hub.

After some experimentation, I came up with a design that not only held very firmly, but used the slight flexibility in the PLA to allow the spokes to be "opened up" to grab onto the hub. Printing these parts flat also allowed for a slight "barb" on the connecting part, which helped created a strong connection until the spokes were physically squeezed to open the barbed ends back up again.

Testing Designs Efficiently


As with many designs, there are small parts that need to be tweaked before they are perfect. When the overall model is large, I like to use a novel approach to testing the most risky parts of the design without printing the whole model. I make a copy of the model and I slice it up into parts - isolating the part I want to test and printing ONLY that part.

For this spool design, it was the connection between the hub and spokes that was most risky and needed testing. Before printing the whole model, I cut off most of the spool, leaving only a small part of the circumference including the connecting part, and printed just that.


You can see in this picture what the TEST PRINT looked like, and this let me reduce the test print time and material by about 80% - giving me more patience to test until the connection was just right.

A Semi-Failure With A Discovery


Generally, the print did not work for me for a few reasons. First, the core was too small for 3mm filament - requiring too tight of a radius. I also need to add an angled hole in the hub to hold the end of the filament firmly. These are easy problems to fix.

So, while I was happy with the design overall, I'm pretty sure that using pre-used spools will suffice. This is likely another "unnecessary creation" which we 3D printing folk often produce ;)

The bright side of this design was the discovery of a new way to connect 3D Printed parts - a goal I've continually pursued. The flexibility of thin PLA prints created a locking mechanism that I'm sure will come in handy in other designs, as it gave me the best balance I've ever achieved between ease of connection and a firm hold.


Sep 19, 2015

Put a hole in it (Make your 3D Prints useful)

Many 3D Printed models that we make are pretty useless. Things like logos, name tags, even models of objects like buildings or vehicles or cartoon characters. I've found one little change I can make to most models to make them at least semi-useful.

Put a hole in it!


I've gotten into the habit of adding a loop or a hole in my models so that at least the object can be hung from a backpack, used as a zipper pull or put on a keychain. This is especially meaningful when teaching a beginner or a group of younger students, as it gives beginner 3D printing enthusiasts a way to show off their work and start a conversation about their new hobby ("Yo, what's that plastic bulldog hanging from your backpack?").

The first time I did this was with the first model I ever printed on my printer. I found a great simple set of Minecraft (tm) tools on Thingiverse. They were cool, but very useless. I simply added a keychain hole to the handle of each of the four tools and they definitely became more useful - or at least displayable.

How to do it


There are two simple methods to achieve this.

First, you can actually punch a hole in the model by subtracting a round circle from the main model with a cylinder. This is the best method for the flat models. I've found that about 4mm is the right total diameter to make it easy to get a key ring into the hole - but it also matters how much material you leave around the hole. It seems that 2-3mm is about right to get enough strength with not too much width to get a keyring around the material.
I try to pick a corner of the model for the hole to give more clearance for the keyring. Sometimes you can get lucky and the hole can become a natural part of the model - like in the Twitter bird name tag examples in the post about name tags.

TinkerCad Torus shapes
Second, you can add a small ring of plastic at the edge of your model - which is the most useful method for wide models which are not really flat enough to allow clearance for a keyring. The two shapes which work for this method are the torus - which is a rounded-edged ring, or a flat cylinder with its center removed. Again, you want to have approximately a 3-4mm hole and 2-3mm of material on all sides - so either of these shapes should have a total outside diameter of around 7-10mm depending on how much strength you need and how thick of a keyring you expect to use.

If you use the second method, remember to add the ring (torus or hollow cylinder) to a place which is conducive to successful printing - not floating out on the side of the model which will require supports or just fail to print right.

Doing this in TinkerCad or 123D


In TinkerCad - you're either using the "cylinder hole" object - aligning the hole object with the place you want the hole - or using a torus, which is offered in a few different ways in the Geometric Shapes category.

In Autodesk 123D Design - you've pretty much got the same options - using a Cylinder and subtracting that from the main object to punch the hole, or using a torus and adding it to the model in a position which will let it print successfully


Sometimes, the hole can be part of the model (birds eye)


Aug 28, 2015

3D Print Your U.S. State in 15 minutes

When you want to 3D print something, first you have to 3D model it, or find a 3D model that someone else made. I was thinking up projects for kids in school, and thought geography would be fun - perhaps to make 3D models of their country or U.S. state - to show off as a backpack charm or to use as a physical model in lessons.

Of course there are some U.S. State objects already modeled on Thingiverse, but not much on Pinshape and others - and besides, half the fun is in the modeling. So I wanted to share how I pursue a project like this to get it done literally in 15 minutes - INCLUDING print time (if I make it small enough). Note - if you live in Wyoming, Kansas or other mostly rectangular shaped states, this is more like an 8 minute printing-only project ;)

Summary

You will trace an image of the object (state or country) using Google Draw (as outlined in a prior post) and then import that into your 3D modeling app to make it 3D ("extrude" it) - then send it to your printer for printing. Easy peasy.

Step 1 - Find an image to "trace"

Go to Google Image Search and find an image of the object you want to model. In my case it is the state of New Jersey. Download that image for temporary use (which you will later completely delete). I use something from an official .gov site that I'm sure provides free access with no copyright restrictions for my use.

Step 2 - Open Google Drawings

Go to http://drawings.google.com while signed in with your Google account and it takes you immediately to a new drawing canvas. You can also go to Google Drive and use the NEW button - and under "More" is Google Drawings.

Step 3 - Import the image for tracing

Use the Insert Image button and import the image that you saved in step 1.

Step 4 - Trace the image

Use the "Polyline" tool (in the dropdown icon where the "line" tool is shown). and slowly create line segments around the outer edge of the image you are tracing. I suggest zooming in pretty far and not trying to get too detailed, as much of the detail will be lost in a 3D print of manageable size. If your line stops extending, just start a new segment at that last point and later group all the lines into one object.

Step 5 - Export the Trace (sketch)

Delete the image in the drawing first, and then use the "Download As SVG" option in the file menu to get an Scalable Vector Graphics file that Autodesk 123D or TinkerCad can import. Both accept that file format, but I found TinkerCad sometimes has issues importing - not something I have solved yet - but give it a try and comment here if you have issues.

Step 6 - Import the Sketch

In your 3D Modeling app, import the SVG. In Autodesk 123D Design, it is in the main menu as "Import SVG..." / "As Sketch". In TinkerCad, it is in the right side menu under "Import" - and for TinkerCad, it automatically takes care of the next "Extrude" step for you. Make sure at this point you re-scale the sketch to be the size you want to print. I found that sketches come in quite large and need extreme reduction.

Step 7 - Extrude the Sketch into an object

You should be able to select the inside area of the sketch and then use the Extrude command to expand it into a 3D object. You can make it whatever height you want, but I used 3mm to keep it small.

Step 8 - Export the object and Print it

Use the export command to create the STL file to be printed. On my Polar3D printer, this is the simplest thing, since I can send the STL directly to the printer through my browser. On my other printer, I have to first "Slice" the STL to create a printable file.

In my experiment, I sketched, modeled and printed a 50mm long, 20mm wide and 3mm high model of the state of New Jersey. Notice also, that I put a hole in my model to be useful as a backpack trinket or keychain - something I do in most of my models.

Aug 16, 2015

10 things to know when you know nothing about 3D Printing

Most people I know have never even seen a 3D printer and ask me "what is 3D printing? How does it work?" and similar basic questions - so I thought I'd share what I usually tell my friends as I give them a demo of my printers in action.
Remember - this is for newbies - so if you've already been 3D printing, this post might be too basic for you. I'm just trying to keep it all super simple, sticking to the basics for people who know nothing yet, so I'm leaving out lots of gory, boring details.

1 - How does a 3D printer work?

3D printers are sort of like ink-on-paper printers, but they use plastic (mostly) instead of ink and they don't print on paper - also they print in three dimensions instead of two. (ok, I guess that makes them nothing like ink-on-paper printers at all - but you get the idea). They pull the plastic, or whatever material you are using, into a heated nozzle, melt the material at high temperatures (e.g. 180C to 250C for common types of plastic) and then squirt it back out in tiny amounts, layer by layer to form a new 3D Object as the material re-dries and hardens almost immediately.

2 - What is the material used to make the 3D Objects?

The most common materials used in home/school 3D Printers are two types of plastic - PLA (easiest) and ABS (harder to work with). There are many other materials besides plastic which are beginning to become more prevalent, like nylon, rubber (e.g. Ninja-Flex), even wood and more. Some of those materials require different "extruders" (the part of the 3D Printer which melts and squirts back out the material) and even different types of treatment on the "Print Bed" (the place where the 3D Model is formed) to make sure the model sticks and stays in one place while it is printing. If you want a model printed in more advanced materials - like metals - you can send them to services such as Shapeways, where they charge a fee to print and even let you sell printed versions of your models.

3 - How does the printer know what to print? 

The objects printed are 3-Dimensional models which are created using computer software. These models are simply files which can be shared and have common formats which 3D printers and 3D printing apps know how to handle. The most common of these common formats are .STL and .OBJ files - and many current printers require these to be converted into another common format (.gcode) which tells the printer exactly how much plastic to squirt out, and how to move along the x, y and z axis to make the object form layer by layer.

4 - Where do the 3D objects come from?

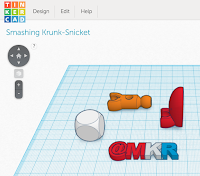
3D objects (more officially called 3D models) are made in two general ways. First, using 3D Modeling software, like TinkerCAD or Autodesk123D Design, you can create 3D objects in a virtual workspace - similar to how a drawing app works, but more complex, since you have to work in three-dimensions. Second, real life objects can be scanned using cameras or specialized object scanning hardware and software (like Autodesk 123D Catch) to create a digital representation of the three-dimensional object.  You can make your own 3D models using either of these methods.

You can also get models made by someone else on community sites like YouMagine, Thingiverse, Pinshape, MyMiniFactory and others (lots of others). Most people I know with 3D Printers actually do more printing of other people's models rather than making their own - but I strongly prefer making my own, as I love to invent new things.


5 - How long does it take to print something?

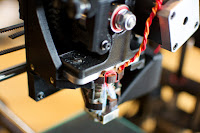
The extruder on the Lulzbot TAZ4
The time to print is very dependent on many variables. First, the size of the object. Most 3D printers can only print things that are somewhere between the size of a guitar pick and the size of a medium-sized flower vase. The guitar pick might take just 2 minutes to print, while the vase might take 10 hours. If the vase were solid (right, it couldn't hold flowers if it were solid - this is just an imaginary scenario ;) it might take 30 hours to print! Second, the speed of the printer itself matters - and it can be adjusted for each print through the software. Third, the quality of the print impacts the time to print. Higher quality usually takes longer, as the layers are more fine-grained and slowing the printer down often increases the quality of the finished product. For most simple prints that I make in the size range of 4"x4"x4", it takes about an hour to complete, as a rough, rough estimate.

6 - How much does the printer and the plastic cost?

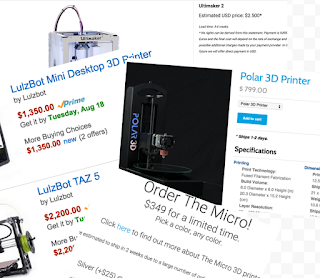
A home or school 3D Printer will generally cost anywhere from $300 to $3000 - yes a wide range. There are also 3D Printer kits if you're into DIY projects, which saves some money but introduces risk of doing something wrong. As with most hobbies, the more you spend, the more you get - higher quality, bigger build size, better features, etc. The "build size" is one of the key differentiators which might make you want to spend more if you expect to print bigger things. Other features which seem to impact cost are generally technical-sounding. Be sure to ask most 3D Printer companies about Educator pricing if you are a teacher or administrator or are buying for a school. Polar3D, for example, sells their printer currently for $799 - but only $599 for educators (25% discount).The plastic used for 3D printing costs about $20-$30 per pound - and you get LOTS of prints out of a pound of plastic. The tiny-sized M3D Printer only costs $350 currently, but you'll give up build size and speed.

7 - Where do you buy a Printer and the Plastic?

Online is the best bet for buying printers and materials. Amazon of course is a good start, but if you know which printer you want, you can typically buy direct. 3D Printing has not yet been "won" by a few large companies, like HP or Dell - it's mostly smaller companies like AlephObjects (makers of the LulzBot), MakerBot, and hundreds of others.
The plastic used to print is a bit easier, but there are also many many suppliers. You just need to know the "diameter" (1.75mm or 3mm are the most common options), the Type (PLA and ABS are the two most common, although many more types are popping up), and the Color. Again, start at Amazon to play it safe, but I've found that the printer manufacturer itself is usually the nest source for plastic for a given printer.

8 - What's the best way to get started in 3D Printing?

Don't buy a printer as your first step! This is my most important tip. You do NOT need a 3D printer to get started in 3D printing. You should first get started in 3D Modeling. Learn how to create 3D Models using something simple like TinkerCAD. If possible, then find someone with a 3D Printer and get them to print one of your models for you - or locate the nearest Maker Space, Library or School which has a 3D Printer and satisfy your curiousity. Yuo can even use online services such as 3DHubs or 3DPrinterOS to find a person with a 3D Printer nearby you who is willing to print things for you. And, of course, Shapeways and MyMiniFactory are professional services which can print for you. Once you know you want to keep going - THEN, buy a printer.

9 - What software/apps do I need to get started with my own printer?

Software: Generally, printers come with, or suggest where you can get, the necessary software to run the printer. Most printers do require you to "Slice" your 3D objects using an app called "Slicing software" - which turns the object file into something the printer can understand (.gcode, mentioned earlier, sort of like turning a document into a PDF). CURA and Slic3r are a couple of the mosr popular slicing apps. Slicing just means determining how each layer of plastic will be printed - layer by layer and it's a complication that I expect will soon be much better built into the printing process. Several 3D Printer companies have already begun to simplify this process - such as Polar3D - by including the slicing software and process in their printers - so you just give the printer an object (STL format) and it prints it.

10 - What else will I need to get started with my own printer?


Hardware: Depending on your printer type, you might need a Mac or Windows computer to run the software - but using something like a Polar3D printer, or a printer connected to 3DPrinterOS, you can use any web browser, and therefore, a Chromebook (very good for schools). For some printers, you might want an SD card to load models directly into your printer or USB or Ethernet cables if that's the recommended connection to print.
Tools: There are just a few tools that you'll need, and the 3DPrintingForBeginners.com blog has a great post to describe some ideas. Some of the tools needed are very dependent on what type of printer you get - so I won't go into that detail in this post (yes, another draft post is in the works on this)
Workspace: I recommend having a well-lit, out of the way, clean workspace where it is ok to generate some noise and some minimal mess (not much with most printers).


Jul 19, 2015

Make it Personal - 3D Printing Text

One of the fun and practical aspects of 3D Printing is the personalization that you can achieve with objects - like adding names, initials or other words to objects to make them unique. Doing this requires rendering text - letters, numbers and symbols - as parts of 3D objects. I recently did a post about some name tag designs which inspired me to collect some experiences about text objects.

Making Text Objects


The 3D Modeling software/app you're using will either help you or hinder you from making great text objects. Most 3D modeling Apps have some sort of text object which allows you to create what you need and then change it's font, size, weight and style to get the look you want. There are so many 3D modeling apps available today, but here are how a few of the ones I know stack up in terms of their text rending.

Autodesk 123D Design is my current favorite modeling app. It has a text object which allows you to select the font from a long list of about 174 fonts (!),  but not all of these actually render (probably due to fonts installed locally and typical licensing issues with traditional fonts). Even if you do find a font you think is cool, remember that they're not all appropriate for extruding into 3D objects. In 123D Design, you first generate a shape and then you extrude that text into actual objects. I found some issues in 123D Design with the "Bold" style of several fonts - it simply will not extrude certain characters into an object - specifically the "@" symbol gave me issues with a font like Futura (bold). But notice that most of my favorite fonts for 3D Modeling are bold - this just helps avoid letter parts which are too thin for good printing. Note that 123D Design also has a great iPad app, but there doesn't seem to be any text support as of this writing.

TinkerCad is a great option for kids and beginners and only requires a modern web browser like Google Chrome. It has a whole category of 3D capital letter objects, popular symbols and numeric digit objects ready to go, which you add to your model one character at a time. But it also has a more generic "Text" object which allows entry of any text, selection of font (from a list of only 6 for now), weight and size. It's not a huge selection by any means, but definitely useful. Find the text option under the right panel object selector called "Shape Generators".

Sketchup is another great, and arguably much more professional, 3D Modeling app - locally installed on Mac and Windows computers. It has around 200 fonts with many different weights to chose from. I don't use this product on a regular basis, but if you really want some professional features or hope to continually increase your 3D Modeling skills, give it a try.

3Dtin is another web-based modeling product used inside a browser. It has only 3 fonts to choose from, and they let you make letters in positive or negative form as soon as you create them.

Morphi is an iPad app which does have some text support, but you have to upgrade the free version for $2.99 to get the full alphabet. There's only one font - basically fully rendered upper and lower case letters - but if you're modeling on the iPad there are not as many options, and this is a great app (which also supports freeform drawing to create objects once you upgrade to the paid version).

Font Suggestions


Some fonts that I found work really well in many cases are the following:
(in Autodesk 123D Design - which is my go-to modeling product. You may find others in the other apps mentioned above or in your 3D Modeling app)

  Arial (bold),   Futura (bold),   Gill Sans (bold),
  Gurmukhi MN (bold),   HeadLineA (bold),   Impact,
  Iowan Old Style (bold),   Kannada MN (bold),   PT Sans Caption (bold),
  PT Sans Narrow (bold),   Seravek (bold),   Trebuchet MS (bold),
  Verdana (bold).

Optimizing Your Text

Baskerville font - thin parts

Things to consider when picking a font include the letter thickness and the complexity of the shape - and it helps to actually extrude the text into objects to look for potential problems. The two main problems that exist are letter segments which are too thin, and orphaned parts.

The example shown here is a font called Baskerville. It's a beautiful classic serif font, but you can see that the width of several parts are extremely thin, so at small sizes, the printing might be too fragile or just not print well at all. Only use fonts like this in bold or larger sizes. When printing in small sizes, I highly recommend avoiding serifs and other complex, thin parts to the letters - and even in big sizes, these details will increase the print time significantly.

The other problem shown uses the lower case "i" and "j" which both are dotted letters and therefore result in what I call "Letter Islands" - that is the dots themselves are not connected in any way to the letter. To use these letters, you can use some tactics I describe later in this post.

Positive or Negative


With designs which have text, you have basically two high level options in your designs. Positive text is just rendering the letters as objects themselves, or where the outer perimeter of the letters is raised out of another objects surface. Negative text is where the letters are pushed INTO another object - whether completely through, like a stencil, or just partially, like being carved or stamped into the other object.

I used a negative design exclusively in one of my prior projects (Alpha-lets) which had one letter at a time stamped out of individual links (to make name bracelets). That worked really well, but was a lot of work to resolve and reconnect all the "orphaned parts" (letter islands) for every letter with a circular pattern - letter "O" being the most obvious, but a problem which exists in 7 of the capital letters in the english alphabet.

My Name Tag project used a positive design and employed a "foundation" to hold all the characters together as one part.
To make a foundation, you simply create a long rectangle or other shape part which stretches to touch at least one part of every character in the design. I used a rectangle at the bottom of the letters in several cases, but you can see I also used the Twitter Bird in one of the designs to be the foundation for the letters. This can be an area of great creativity, where you can make the functional element of the foundation become a style element of the design itself.

When extruding your positive text, you might be tempted to make the letters higher than they ought to be. I would start not too high, and only use very high letters if the design simply looks amazing with that style. In most cases, the text becomes less legible, since you can't see the outline of the letter as well from the side.

Letter Islands

Connector holding the Letter Island
in the middle of the @ symbol

One important complication that arises much more with negative designs than positive is the "orphaned" bits - those parts which are no longer attached to anything to become part of the object. I call these "Letter Islands". In positive designs, the dots on the lower case "i" or "j" are the only letter islands. In negative designs, you get letter islands with every circular letter and others - the inside of the "A", "B", "D", "O", "P", "Q", and "R" all have this issue, and that's just the capital letters. Depending on the font you select, you might experience even more of these issues due to loops that are part of the style of the font (think of the script "L").

I used a couple of solutions for letter islands. First, I would create small connectors - bridges - and simply connect the bridges to the other parts of the letters in places which seemed natural. This gave the look of a stencil to the negative letters in my Alpha-lets project. Second, and much easier, I would simply create a base on which to place all the letter parts so that they rise out of a platform. That was a much simpler approach that even a beginner can do with practically no effort. This is a motivating first project for kids!

Summary


Use text! It makes your designs interesting, unique and personal. Kids in particular love to see their name or nickname turned into a real object they can wear on their backpack or keychain, and even adults really become more interested in how they might use 3D Printing when they see the impact of a custom logo or personalized product. The simplest way to get started is to choose a great font, like Impact, then simply mount all your letters on a solid background "foundation" to avoid the issues of letter islands - and then try something more complex.

Jun 14, 2015

How to Make a 3D Printed Hinge

Modeling in 3D is much easier than it used to be, thanks to apps like Autodesk 123D Design and many others. But depending on the object you are trying to model, it might be tough no matter how easy the app is. In some cases, the modeling and design is just challenging.

Take for example box with swinging door. Sure, you could print a simple box, a simple door and then screw or glue a metal hinge to connect the two - but wouldn't it be cool to #3DPrint the hinge too?!

I came up with a hinge design that I doubt is that unique, but I started from scratch just for the challenge. Once it was printing well, I put together these instructions on how to 3D Model it so that others can see how it might be done. There are likely a hundred other ways to do it, but here's one way. If you can't see the presentation below, Click Here to get to the published version in Google Slides

May 25, 2015

Multi-Color #3DPrinting - using Sharpies (tm)

Most reasonably priced, and many fairly expensive, #3DPrinters print one color at a time - which practically means that most objects you print will be a single color. Boring!

One technical way to get multi-color is sometimes expensive and still limiting - that is to get a dual-extruder, where two colors can be loaded and printed during one print cycle. Our school tech club has a FlashForge dual extruder, and while it's cool, it's still limiting - allowing exactly two colors.

Another way to get multi-color #3DPrinted objects is to design models which are multi-part so that each part can be made in different colors and then connected. This is my preferred method so far - but it is truly hard to design in 3D Modeling software with this in mind.

Of course there are much more expensive printers which achieve not only multiple colors, but even full-spectrum color, like your desktop paper printer does. But with the types of 3D printers that most of us have, I found another, more crafty (some might call it fake) way to achieve multi-color - that is, to print your objects using white filament and then use Sharpie (tm) markers to color the models any way you want. What I like best about this method, is that it requires some good old-fashioned arts and crafts action - drawing with your hands (imagine that!).


I've experimented a bit with this, and so far it works pretty well. Included in this post is a video (quick time-lapse) of me coloring a miniature version of my custom designed Minecraft (tm) TNT block. I found that using Sharpie's for even minor highlights really makes some models look significantly better. When I print that same TNT block in pure red - it's hard to see the letters or the other details, like the fuse on top, which I can now color in black.

My experiment with the Minecraft (tm) sword shown in the images in this post was circularly inspired by my friend Alice Keeler's post where she suggests using spreadsheets as a pixel art creator - and she showed an image of a pixel-art Minecraft sword. I used that design as a guide to try coloring my own #3DPrinted Minecraft Sword... Not too shabby (ok, a little shabby).

The before (white) and after Minecraft(tm) Sword!

Apr 26, 2015

Rotate It! Bed Position Matters in 3D Printing

Getting my 3D Prints to stick to the bed is probably one of my biggest challenges. It's mostly with small parts - and I've mostly had issues when trying to print many copies of the same part all at once. But recently, there was a specific part which was giving me issues where a little experiment uncovered something surprising.

The Problem

The part I was printing is a link for a bracelet - so it is only about 25mm square and has 4 protrusions starting at the base layer which are the receptacles for pins which hold each link of the bracelet to the next. Those protrusions - or two of them in particular - were peeling up from the bed after the first few layers of printing, and causing the printer extruder head to force it out of the way as it printed successive layers. This caused some mis-shaping - but luckily the model would eventually self-correct and continue printing to the end without forcing the whole object to come loose from the bed. You can see the start of the problem pretty clearly in the video embedded here - the protrusions on the right side are fine, but not on the left - notice how they are higher than the current print layer.
The ultimate impact of the peeling was that the protruding parts where the peeling occurred were mis-shaped and not smooth at all in the final object. The print head eventually re-melted and flatted the problem sections, but not in the way which the part was supposed to be printed. You can see this in the images here too.
Here's a close up of the final print - those protrusions which had the problems (now shown on the right) were consistently mis-shaped.
Original Position - the left protrusions were the ones experiencing peeling
For you technical 3D Printers - this is the bottom layer from CURA - in the original rotation position

Discovery of an Idea

I was using  a live video service - Periscope, on twitter (@periscopeco) - to show people this particular print, and someone commented that perhaps it was the position of the object's receptacle parts that was making this worse. I figured it was worth a simple experiment - since I had tried a few other fixes that didn't help.

Experiment - Rotate the Object

Without changing the model or the slicing parameters at all, I rotated the part 90 degrees clockwise so that the receptacle which had the worst effect was now not the first part of the print layer. I could tell right away that this small adjustment did have an impact, as the first few layers of printing were clean and flat, and there was no peeling off the bed. In the prior experiment, I had slowed the printing of the bottom layer to 15mm/sec (in advanced settings in CURA) - but that adjustment alone did not help - but I left it like that and did the rotation.

After 90 degree rotation, the receptacles are now printing smoothly and are shaped as expected in the model design.
NEW ROTATION POSITION, with the problem parts now pointing away from me on the print bed.

And again for the technical folks, the bottom layer shows hardly any pattern change - just the rotated position.

Results

In the end, the object printed much better, without peeling, with a simple 90 degree rotation! I was quite surprised - but pleased of course. Now I am analyzing the layers to see what may have changed in the slicing - so that I can get to the bottom of what the rotation changed in the printing commands, as I have a hard time believing that the rotation itself actually matters. But - TRY STUFF! When you have a problem, try lots of potential changes to the printing parameters and even the positioning on the bed. You never know what you might discover.


Mar 22, 2015

My Box of #Fails is a Box of Learning


Right next to my 3D Printer is a small box partially filled with a bunch of my failed prints. Most are partial objects with globs of plastic or streams of spaghetti-looking plastic hanging off. Each one is special. Each one an example of something gone wrong and a reminder of a lesson in how to correct it.

Whenever my kids come to print something or bring their friends by to see the printer, the first thing they see is my box of fails. It intrigues them, and they invariably ask what happened with each one. They also get a good chuckle from the silliness of how each one looks. But the most important part is how they see my pride in my failures, and hear how each one of my fails is a lesson - a step toward success.


Keep your #Fails close by. Share them. Smile when you see them, even if they frustrated you when they happened.

NOTE: This post was inspired by a visit from my daughter and her friend to my printer - after they spent more time talking with me about the Box Of Fails than the successes I was showing off. While I was writing this post, a print I was working on failed. Here it is below before it was even removed from the print bed - and you can see above, as it has already been added to my collection of lessons learned, in my Box of #Fails (although, I must admit, I haven't solved this one yet ;)