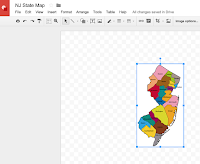
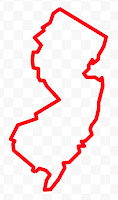
Of course there are some U.S. State objects already modeled on Thingiverse, but not much on Pinshape and others - and besides, half the fun is in the modeling. So I wanted to share how I pursue a project like this to get it done literally in 15 minutes - INCLUDING print time (if I make it small enough). Note - if you live in Wyoming, Kansas or other mostly rectangular shaped states, this is more like an 8 minute printing-only project ;)
Summary
You will trace an image of the object (state or country) using Google Draw (as outlined in a prior post) and then import that into your 3D modeling app to make it 3D ("extrude" it) - then send it to your printer for printing. Easy peasy.
Step 1 - Find an image to "trace"
Go to Google Image Search and find an image of the object you want to model. In my case it is the state of New Jersey. Download that image for temporary use (which you will later completely delete). I use something from an official .gov site that I'm sure provides free access with no copyright restrictions for my use.Step 2 - Open Google Drawings
 Go to http://drawings.google.com while signed in with your Google account and it takes you immediately to a new drawing canvas. You can also go to Google Drive and use the NEW button - and under "More" is Google Drawings.
Step 3 - Import the image for tracing
Use the Insert Image button and import the image that you saved in step 1.
 Step 4 - Trace the image
Use the "Polyline" tool (in the dropdown icon where the "line" tool is shown). and slowly create line segments around the outer edge of the image you are tracing. I suggest zooming in pretty far and not trying to get too detailed, as much of the detail will be lost in a 3D print of manageable size. If your line stops extending, just start a new segment at that last point and later group all the lines into one object.Step 5 - Export the Trace (sketch)
 Delete the image in the drawing first, and then use the "Download As SVG" option in the file menu to get an Scalable Vector Graphics file that Autodesk 123D or TinkerCad can import. Both accept that file format, but I found TinkerCad sometimes has issues importing - not something I have solved yet - but give it a try and comment here if you have issues.
Step 6 - Import the Sketch
In your 3D Modeling app, import the SVG. In Autodesk 123D Design, it is in the main menu as "Import SVG..." / "As Sketch". In TinkerCad, it is in the right side menu under "Import" - and for TinkerCad, it automatically takes care of the next "Extrude" step for you. Make sure at this point you re-scale the sketch to be the size you want to print. I found that sketches come in quite large and need extreme reduction.Step 7 - Extrude the Sketch into an object
You should be able to select the inside area of the sketch and then use the Extrude command to expand it into a 3D object. You can make it whatever height you want, but I used 3mm to keep it small.Step 8 - Export the object and Print it
Use the export command to create the STL file to be printed. On my Polar3D printer, this is the simplest thing, since I can send the STL directly to the printer through my browser. On my other printer, I have to first "Slice" the STL to create a printable file.In my experiment, I sketched, modeled and printed a 50mm long, 20mm wide and 3mm high model of the state of New Jersey. Notice also, that I put a hole in my model to be useful as a backpack trinket or keychain - something I do in most of my models.


Can you show the topography of the state also, like mountains or bodies of water?
ReplyDeleteAbsolutely! That's a great idea to show topography. I was thinking at first to use some demographic data to define the height of each area, but couldn't find quite the right stat (and wanted to get the project done at least in simple form). THANKS
ReplyDeleteThanks for sharing. These days I often find myself sharing a work space with a couple 3D printers.. This is great
ReplyDelete