The small footprint, unique radial bed design and apparent simplicity of the technology is what attracted me. The two passionate and experienced engineers who invented this product, who were also running their own booth and answering questions, also got my attention. The web-based printer command center put me over the edge.
Setting it up
From un-boxing to printing took me about 20 minutes. I was being careful and slow, but the one page description which came with the printer - while brief - was pretty much all I needed to get this simple printer into action.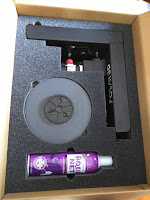 The hardware setup was ridiculously simple. This printer is basically two parts in the box, not counting the power cord and the (almost hysterically funny) cannister of hairspray which is included. Hardware setup was one step (not counting again the plugging in of the cord). The print bed - a round piece of mirrored glass with a big gear on the bottom, just sets into place to fit with the gear on the printer. That, it turns out, is the genius behind this printer's radial design - which overall reduces the moving parts and belts and other things that could go wrong.
Getting the WiFi connection set up was also simple, but to be fair, might be harder for people who have not done something like this before. Basically it was a matter of connecting my computer to the printer's WiFi signal, then telling the printer about my home WiFi so it could connect itself - then reconnecting my computer to my normal WiFi. Alternatively, I could have connected my computer to the printer directly via ethernet.
The Hardware
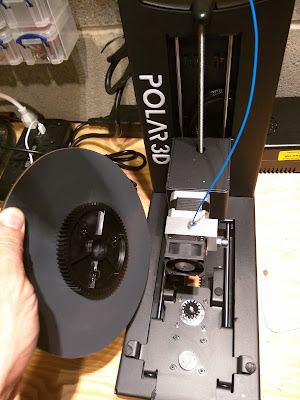 The Polar 3D is small and sturdy. It measures just 8 inches wide, 15 inches high and needs approximately 15 to 21.25 inches of depth (12.75" base + 2.25" for the bed movement forward and another 6.25" for the filament spool holder, which is optional). This especially narrow footprint achieves a build volume of 8 inches in diameter by 6 inches high. The radial movement design is what accounts for this rather generous build volume in that small footprint, as the extruder only has to travel the radius of the circular bed - meaning the bed spins as it moves back and forth on the y axis - rather than the whole distance of the y or x axis.
Full specs can be found at the Polar3D website.
The printer is strong and weighty enough in a good way without being too heavy. It is practically all metal, except for a plastic molded handle insert which makes it comfortable to carry. That handle and the small physical size makes it basically mobile, and I wouldn't hesitate to take this printer with me to a school or to the office or even a friends house to show it off and print stuff for a few hours.
Some additional nice hardware features include the built-in micro-camera, which lets you watch your prints live, the easy to remove/clean circular bed, which is by far the simplest design I've seen yet, and the incredibly simple extruder design, which makes loading filament easy. That extruder design lets you use multiple filament types such as Ninja-Flex in the single extruder (by the companies claims only so far - I have not tested this). These are not actually small things - they could be huge differentiators if they all pan out to be working as expected.
The built-in Raspberry Pi micro-controller provides strong performance, connectivity, on-board model storage (16Gb, with about 8Gb avail for models) and more. There are also several connectivity ports, including Ethernet, USB Serial port and a USB Thumb drive port for direct access to stored model files. The printer also includes WiFi - it emits a WiFi signal to gain initial connectivity where you configure it to connect to your local home or school network. This is how I have used this printer thus far with practically zero issues (one time it disconnected and had to be reconnected).
The Software (Web Services)
The Polar3D is more than just a printer. It is a set of very powerful software products and services which have actually made the experience of using the printer an absolute delight. All their software is either installed on the printer directly or available through the web-based cloud services. With my beloved Lulzbot TAZ4, I still use an SD card to run models back and forth between my Mac and the printer for printing, or I connect my Mac directly to the printer. With the Polar3D, I do everything through the web - sending my models for printing directly to the printer. This will be how things are done much more broadly, I am sure.The Printer Control Panel.
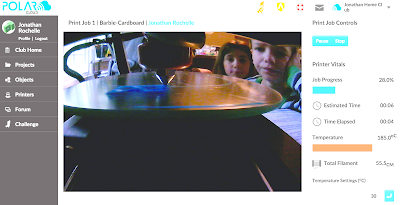 |
| The built-in camera lets me see the print live in progress, and see the kids watching it ;) |
Since each printer also has a camera onboard, you can see the progress of every print live from anywhere you can gain web connectivity. To go one step further, every print job run is saved in the printer's history - so you can see information about all the prior print jobs, and - wait for it - you can watch a time lapse" video of any prior print which is automatically saved! I can also see the configuration settings from that history and download the STL among many other options. #mindblown
The control panel is one of the most impressive aspects of this company's software offering - and I was initially sure that it was a turn-key provided by another vendor, but it's all theirs. That Web-based (Multi!)printer control panel seems like something that quickly needs to become a service offered separately from the physical purchase of their printers - similar in a way to what MakerBot did with Thingiverse.
 Clubs, Objects, Projects and more
The capabilities to organize objects and projects online, through a web-based interface, are also extensive in the Polar3D cloud service. They offer Clubs, Objects, Projects, Collections and more.Clubs give you the ability to virtually have your own object sharing service which you can manage while inviting others to participate or co-manage. I can see this being used effectively in schools, tech clubs, maker-spaces and more.
Objects (3D Models) can be uploaded and shared through the Polar3D service and the common "favorite" count and "collect" count lets you see how popular they are.
 Projects provide educators a place to describe lessons related to 3D Printing, allowing uploads of supportive materials like documents and images. This is a much more general capability than something tied to 3D Printing specifically.
Collections and subjects allow another level of managing and organizing objects. There are public collections and club-based / private collections.
I haven't used all these capabilities enough yet to give a detailed review or critique, but I'm excited about the abilities to both organize and even "white-label" my own collection of objects for both managing and sharing. I'll write more on this later for sure.
The Slicer.
Polar3D integrated the CURA open-source slicer into the printer so that you just feed it objects (.STL files) and it slices and dices (I mean, prints) the object directly. You can get into the CURA settings if you want to, but the point for some people will be that you shouldn't have to. I've found my early simple prints to be really good on the default settings, with minor issues only when I tried to do things like remove supports on a print which really did need some. The interface to the CURA settings is certainly different than CURA itself, but it was easy to find my way around - with tabs for Quick Start, Basic, Advanced and Start/End Gcode.The Modeler (?).
Yes - there is even a modeling capability built into the Polar3D software stack. That said, I don't use it and didn't really go beyond building a simple stack of shapes. Nor did I try to print anything made in it. I don't see the need for this, but it's potentially useful to have it in cases where you just need a simple model or adjustment in a pinch and forgot your password to TinkerCad or 123D Design ;) (I use the latter and see no reason to change that).The results
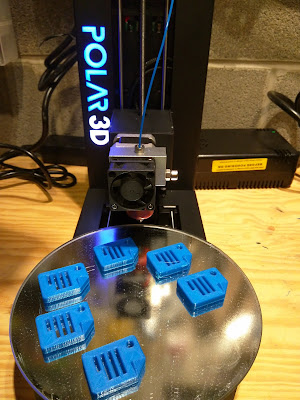 I've printed about a dozen, mostly small, models and I must say the results are incredibly good. When I tweaked the slicer settings to my liking - such as improve the quality (reduce the layer height from 0.32 to 0.2), the results were impressive and consistent. I even tried to print the small, challenging interlocking "Alpha-let" bracelet links, which require good, small precision for the interlocking design to work - and it printed 9 links at a time with perfect results. The prints from this printer required even less cleanup than my TAZ4 (which everyone knows I love).
Since I only had blue 1.75mm filament), I printed one of my favorite blue models - the Google Docs icon I designed very early in my 3D Printing life. I printed one alone, which came out perfect. I tried to print 6 at a time, and again, all 6 came out perfect.
The best test was my own 3D Hinge design. This one is challenging, as it prints both sides of the connected hinge in one run with only 0.4 - 0.5mm between the moving parts - giving lots of opportunity for unwanted binding of the moving parts. There was definitely some unwanted binding in this print - but with a little cajoling and loosening the intended gaps with the clam knife (my favorite 3D Printing tool), the hinge loosened and worked like a charm.
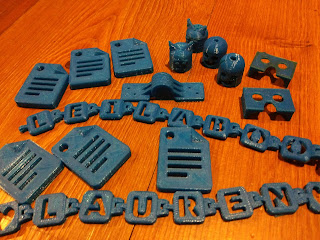 |
| Some early models printed on the Polar3D. All Blue ;-/ |
Summary
The Polar3D printer is unique in ways which make it very desirable - not just novel. The narrow footprint, simplicity of the hardware, quality print results and robust web-based printing control software all top my list of positives. Of course, the price point - $599 for educators and $799 retail - make it truly a reasonably priced printer for schools and others. Seeing 15 of these printers cranking away making models all night and day at the ISTE education conference gave me initial confidence that this printer was for real - and trying it on my own so far has proven the reliability (albeit early) beyond a doubt. If it turns out that I can actually print multiple filament types - like Ninja-Flex - through this one extruder... wow, that'll really be a bonus!On the downside.... uh... well.... the build volume could of course be bigger and the power supply transformer could be slightly quieter. Of course there are also small things I might recommend be changed in the software design (if I stretch), but overall, it's incredible how much this small company has already achieved and provided in this printer.
While only having used this printer myself for about 10 days, so far, I highly recommend it. I'm excited about how the unique radial design has simplified the mechanics and how the web-based printing control truly makes life easier (well, for 3D printing, not life in general ;).


I've had this printer for a couple weeks now, although I have not printed very much from it. About 6 objects or so.
ReplyDeleteI think it is a fairly solid opening product. There's definitely room for improvement, but it does what it is supposed to do and focuses on the market it intends to.
Depending on the object, due to the way the platform and extruder move (or not as the case may be.), I have occasionally gotten holes in the sides of my prints where the nozzle sits as the plate spins. My best guess is that this causes prolonged exposure to that one point and results in the plastic melting a bit more after extrusion. Thus causing a gap.
Having this live on an University campus with a wireless setup that requires devices to be registered, or use Enterprise authentication is a terrible experience. I can't connect it to wireless even if I wanted to, because this printer (as of firmware v1.0.3 at least) requires the connection to be to a WPA-PSK network. Then, if I want to get the MAC address to register the hardware for our network, I needed to pull it from the website, which required internet access, etc, etc. So I couldn't get it to the internet even if I was able to connect it. Having mentioned this on the support website, they are interested in learning more about this kind of network configuration in order to help users get setup in the future.
The engineers don't recommend using purple glue stick or painters tape like I can with other PLA printers I have access to. And thus far they are correct. I have only been able to successfully print with the hairspray. A minor annoyance, as spraying aerosols in an office/lab environment is tricky if you haven't prepared an area specifically for it. As much a problem with using multiple types of printers as it is anything else, so I can't knock it too much.
If I load an object that is greater than 10mb, I get warnings. Sometimes those things will print, sometimes not. There is no indication of a print job slicing, transferring to the printer, or getting ready to print unless it is on the web interface. You get a little status bar that terrifies me with it's non-motion. When you send an object to print, the bar starts and usually gets to 40%. That's when it is trying to slice and transfer the object. If your object takes a long amount of time, it is easy to believe that the system has locked up and the only solution is to pull the plug on the printer. I much prefer Cura or Makerbot Desktop and it shows a percentage of completion for the slice and a separate percentage of completions for job transfer.
Initially, I could not print via USB. Again, ties back to my network trouble to get it online. It is a feature they were promising in a future firmware release. It very well could be out now, but I haven't tried it again yet. It was frustrating at the time when I couldn't get the printer on our network. I had a product to test and no way to use it. (I ended up putting it onto the wired network, but only after much handwringing. You don't typically plug in "magic boxes" to an enterprise network without knowing everything about it. I was worried it might broadcast something, or be hosting it's website on the device itself since the setup instructions allude to that. Last thing I needed was Network Security to come down on me.)
Overall, I like this printer and it's simplicity. I agree that it produces good results, especially for the education pricing. The web interface has some interesting points (clubs, etc) and can really help with certain environments. However, there are some technical issues that need to be addressed, and there are design mechanics that users need to be aware of before committing. At least, from my perspective that's the case.
Thanks for the extensive additional information and experience!
DeleteRegarding the positioning of the extruder when the print bed spins - YES - I forgot to mention that the company suggested positioning smaller items midway between the center (where the spin impact is greatest) and the perimeter of the bed.
Admittedly, I did not try the larger (>10Mb) models enough to hit some of the challenges you describe - so it's very helpful to get your early experience here. I've focused on smaller parts in my early projects - especially those which seem to be useful in early school projects - but I do expect to do larger models as well soon.
thanks again
"Polar3D integrated the CURA open-source slicer into the printer so that you just feed it objects (.STL files) and it slices and dices (I mean, prints) the object directly."
ReplyDeleteFinally. No seriously. I've been asking for this for years. This is the 3D printer I can recommend to anyone. And I'm going to.
Thanks for posting this review! If any of your readers have any questions, please have them contact me at wjsteele @ polar3d.com.
ReplyDeleteThere is no indication of a print job slicing, transferring to the printer, or getting ready to print unless it is on the web interface. best printers 2015
ReplyDeleteNice post. Thanks for sharing.
ReplyDeleteNon woven bag machine