May 15, 2016

3D Printed Event Hashtag for Google IO 2016

Back in 2008, I attended my first Google IO event - a conference put on by Google to focus on tools and platforms for developers mostly (programmers).

Since those early days, the event has grown tremendously and is now the premiere forum for Google to introduce new, innovative products for everyone, with a deep focus on platforms like Android and Chrome and developers on those platforms.

But this isn't a post about Google IO. This is a post about a 3D Printed keychain I designed to celebrate Google IO 2016.

Model design


I admit - I didn't give much thought to this design. I simply wanted to have something to give out to my friends and others who show interest in 3D Printing (if you see me there, mention this post and I'll give you one if I have any left).

I just used the Google IO 2016 hashtag that I hope everyone decides to use - so not the long version #GoogleIO2016 - but rather the shortened #io16.

To make this model, I simply created the text, using Gill Sans font (which seemed to match the font on the GoogleIO site the closest) and then made a frame to hold all the parts easily. I actually referred back to my old post about 3D Printing text to help choose the font and to consider positive and negative (cutout) designs.

Making the model slightly more interesting


This is a rather boring model, I know. To add just a bit of interest, I decided to try rotating each letter/number a bit on the y-axis.


At about 15 degrees, this looked pretty good! I simply chopped off the bottom part (underside) of each letter/number after rotating to keep a flat base, and this became the preferred design for sure.

Got an event coming up? Got a Twitter hashtag you like? Make a 3D Printed keychain to show some love!

The Model


If you've really become a fan of GoogleIO, you might want to print some of these before the event on Wednesday this week (May 18-20, 2016).
Here is the model on Thingiverse :)

May 13, 2016

3D Printed Logo for Google Keep

My newest favorite Google app is Google Keep.

It's a quick scratch pad, list keeper, note-taker, image-grabber, doodle-maker, even voice-note-taker app. It's fast and it works on every device where I need it - my phone, my kid's iPhones, and the web - and it lets you share notes with other people.

Google Keep is perfect for that shared grocery list or those quick meeting notes, or that inspirational idea keeper...

But wait - this is not an app review - this post is about the Google Keep LOGO.

Design Goals


I was simply looking to represent yet another Google app logo in a form which could be used as a key-chain or backpack charm. I've done this, as you probably know, with a few other Google Apps, so it seemed fitting to now do Google Keep, since I use the app more than once a day.

The Google Keep logo is a light bulb on a small note pad looking base with one corner turned up. One of the goals of all these logo models is to keep them simple so they print easily and quickly. In the case of the Keep logo, I had a couple of options.

The base was easy, but my options for the light bulb seemed to be either to make it just a cut out into the base, or to make it stick out vertically from the base.

Design Process


The individual parts which make the bulb and base
I started with the easy part - the base. This was a variation on the Google Docs, Sheets and Slides base - that is, a rectangle (square in this case) with a turned up corner. I did the same thing as before, creating the square foundation at about 40mm square and 4mm high, then cut off one corner and rotated it about 135 degrees to appear to be turned up.

To make the bulb, I connected a round sphere to a cylinder. I then created a smaller cylinder at the bottom of the first to represent the bottom part of the electrical connection on a light bulb. I also cut a small gap about halfway down the larger cylinder to create the slight horizontal line that the logo has. I did this using a narrow, wide cylinder and then using the subtract tool to cut it out of the longer cylinder.

Now, I had to try two variations.

On the first, I simply subtracted the whole bulb shape from the base to leave a cut-out in the base in the shape of a light bulb.

On the second, I also cut out the light bulb shape from the base, but I made that cut-out slightly larger than the bulb and placed the original bulb centered in the middle of that cut-out. I then created a simple cylindrical connector to attach the bulb-base to the logo base - so the light bulb would be connected but still appear to be floating.

On that second variation - which looked quite good - I simply had to flatten the back side of the rounded bulb so that it would lay flat on the print bed along with the logo base. I only realized this after trying to print once and having a slightly artistic looking failed result ;)

The Model


This is the first time I created a logo model with two variations - but I like them both, so I'm posting both here.

The first is the cut-out light bulb.

The second is the floating light bulb.

Both models are HERE.

Hope you print lots of these for the Google Keep app users you know!


May 4, 2016

3D Printed Piggy Bank - a Journey in Problem Solving


This is a guest post from Bethany Jones, who currently teaches a 7th grade science elective called Engineering Design in Mason, Ohio. Bethany is the mother of two tiny humans and one very energetic dog. She is a tinkerer, lover of learning and recent 3D printing enthusiast.

“If at first you don’t succeed, call it version 1.0”
This has become my motto as I have leapt headfirst into the world of 3D printing with my 7th graders. One thing I have tried to share with my students is that it’s not all about the end product, but the journey you take along the way. There is often more learning that takes place through failing than if you get it right the first time around.  

Ever since our 3D printer arrived a month ago, I have been adamant that it not just be a toy, but an avenue for creation.  I am encouraging my students to try designing something on their own that has a purpose or that solves a problem. In an attempt to show them that I was in this crazy new adventure with them, (as well as wanting to test the print size limits of the printer) I decided to make a piggy bank.

I kid you not, about an hour into the print, a group of students are hovering over the printer watching in awe and one says, “how are you going to get the money out Mrs. Jones?” Face-palm. I had forgotten to put a hole in the bottom to get the money out! 

I told my kids that we’d just have to break it open. It ended up not mattering, as this version printed with a giant mystery hole in the back. But I quickly went back to the computer and edited my model to include a money-retrieval hole in the bottom. Great teachable moment about learning from your mistakes right? 

My students and I had fun analyzing the possible causes for the other print issues and we decided to try and make the walls thicker for more support and hopefully close the mysterious hole.

The second time around, I think something went awry with the printer as everything went well until the very end. The slot on the top printed crooked and the ears  were hanging on by a thread about halfway up. Since I couldn’t find any explanation for this, I printed the same model with no edits and it worked! Third time's the charm!


I am loving the iterative process of designing, printing, redesigning and reprinting until I get something right. It is a wonderful lesson that my students are learning as well. I am finding that in a world where they may have been afraid to fail before, they are energized by the possibility that they can analyze the problem and attempt to fix it! Beyond making something cool to look at, it is something to be proud of when you can create something on your computer screen and make it come to life as a tangible object to enjoy and share with others.


*Addendum: Fast forward one day past writing this post and the poor perfect piggy version 3.0 took a flying leap off my desk and met his demise as a clean break ripped through his body, splitting him in twine. I almost cried real tears in front of my students. But looking on the bright side, as one must do to remain sane, we can now analyze broken piggy from the inside out.


May 1, 2016

4th Grader Science Fair Project: Stronger 3D Printing

Every year, my kids participate in our school district's science fair. This past year (March, 2016), my 4th grade daughter - working on her 5th science fair since Kindergarten - decided to use 3D printing as her target.

After some discussion with her 3D printing-crazed dad (ahem), she decided to test the strength of 3D Printing using different print orientations.

The problem she was working on in her project was how to print stronger 3D printed objects.

She witnessed an issue I had with some hooks I printed for my pegboard a while back, and she generally thought that was an area that could use some experimentation.
Yes - I helped lead her in this direction - no doubt about it.

Her hypothesis was that the vertical layers (layered upwards along the z-axis) were not as strong as the horizontal layers printed along the x- and y-axis. She has seen many failed prints (of mine!) and has gotten familiar with the difference between the upward layers of a print and the horizontal layers.

Two test links - one horizontal, one vertical

I'll leave all the details to the slide deck - embedded below - which she made and printed for her poster board for the 2016 Science Fair.

Apr 29, 2016

Replacing a Broken GoPro Drone part with 3D Printing

One of the most exciting things about 3D Printing is when you can use it to replace or fix something that breaks. Last time this happened, it was a clock which fell off the wall (no , I didn't knock it off the wall). This time, it was a small GoPro camera part.

Is it strange that I felt lucky when I had something break that gave me this opportunity again? Yes, it's strange. But at least I didn't break it intentionally ;)

The Problem (the broken thing)


I have an older model Drone (DJI Phantom 2) which has an older GoPro Hero 3+ connected to it using a Zenmuse gimbal on the underside of the aircraft. The GoPro is held to the gimbal with a hard plastic strap. That hard plastic strap broke.

As you can see in the image, the break was right at the part where the screw receptacle fits. As soon as I saw this, I knew that I could likely re-use the screw receptacles and fit them into a new 3D Printed plastic strap.

The Solution


I measured the inside spacing of the plastic strap and the thickness of the plastic in both dimensions. It was pretty simple to design a solution here.

First I created a rectangle block to represent the outer measurement (which was the inner measurement plus times the plastic strap thickness (times two for the width measurement since there are two sides to account for on that dimension but only one on the height). Then I created a similar block for the inside measurement to be used to SUBTRACT from the first block. That gave me the basic shape of the strap.

For the ends where the screw receptacles would go, I created a small 7mm x 7mm x 7mm block and then tweaked one edge to make a slightly angled side as you can see in the image. This was an almost exact replica of the original strap design. I duplicated that block for the other side.
I combined those parts so that I had one part for the whole strap.

Then I subtracted holes into the ends of the blocks where the screw receptacles would go. This was the only area where the model needed some precision - so it took a couple of tests to get it right. These holes were 2.1mm radius (4.2mm diameter) and 5.5mm deep.

The Model


Having the metal screw receptacles from the original part made this really easy. If I didn't have those, I might have just left a tiny hole in the plastic ends and hope the screws would hold on to the plastic, but I'm not confident that would work for very long.

If you plan on printing this part, be sure to get a hold of screw receptacles, or modify the model to have a different connection design.

You can find the GoPro Hero 3+ Gimbal Strap on my Thingiverse page.

Apr 12, 2016

5 reasons to have a 3D Printing Pen

My first 3D Pen - 3Doodler 1.0
More than a year ago, I saw my first 3D Pen - the 3Doodler - and I immediately bought it. It seemed like such a cool combination of creativity and modern technology. I had already gotten into "traditional 3D Printing" (did I really just say "traditional"?), and figured this was a natural extension of that. I didn't have any expectations of how or why I would use it, but bought it to help figure that out.

Why have a 3D Pen?


After using my 3D pen a few times, I really enjoyed creating things with it, but I also recognized that there are reasons to have them that differ a bit from the reasons for having a 3D Printer. That's what I'll outline here, a few reasons why a 3D Pen might be something you "need"...

Reason 1: Help you understand 3D Printing.

While 3D Printing is not rocket surgery, it's more fun to learn how it works by seeing it rather than reading about it or watching a video. A 3D Pen is a low cost, simple way to see 3D Printing mechanics in action. Yes, it's just plastic melting and being re-formed to harden again. But seeing it first hand - and being able to quickly create something without 3D Modeling skills or expensive machines - is cool.

Reason 2: Be Artistic in a New Way

My 2nd one - the Scribbler 3D Pen
Kids - and bigger people - often love making things. Crayons, markers, paint, yarn and fabric, even duct tape - it's all fun. But how often is there a NEW medium to create things? Not often. Melting plastic and reforming it into a new thing - now that's NEW - that's COOL.

Reason 3: It's Easy.

Making 3D objects with wood is amazing, but very hard, requiring many tools, perhaps dangerous electrical tools, and very time consuming.  Paper machè is great and simple - but it's messy! 3D Pens are easy to set up, take almost no time to get going, have minimal training with very small danger risks (watch the hot end!) and super easy to clean up. Learning how to do it is easy too! In a short session, kids can see results and even collaborate by building different parts of a larger model.

Reason 4: It's Cheap(er).

A great 3D Pen costs about $100 (although I actually got my Scribbler 3D Pen for $69, even though they now seem to be no less than $99). The PLA filament is also very cheap - about $20 for a whole roll (and you can try to calculate how much a printed object costs). A good 3D Printer costs about $500-$1000, and a better one costs more like $2000.

some experimental creations ("art")

Reason 5: Practice Experimenting and Failure

If you think creating something with a pen or crayon that you would call "Art" is difficult, well, just imagine trying that in three dimensions ;)

One thing I love about all arts and crafts is the practice it gives us - as kids and adults - in trying new things, in experimenting, in failing and trying again! Experimenting is such an important step in innovating, and that's why I love all kinds of art for EVERYONE. The 3D Pen is a great tool for this sort of practice - and is a fun alternative that spurs people's interest in something they may have never tried before. That's a good thing!

One reason to NOT get a 3D Pen.


Do not get a 3D Pen as an alternative to a 3D Printer.

not so precise mini-building
It is not at all the same thing. A 3D Printer is basically a robot which melts plastic and forms it into an object that has been modeled with 3D Modeling software. While that type of 3D PRINTING is not artistic - the 3D Modeling part can be VERY artistic. It's just that the actual printing process is not the artistic part when using a 3D Printer.

Conversely, the 3D Pen is NOT a good way to precisely create a 3D object for functional use. It is very hard to create an object of precise measurements or with straight edges or smooth, measured curves.

The comparison of 3D Pens to 3D Printers is analogous to comparing drawing by hand to printing with an inkjet printer - the first being artistic, the second being functional. Bat, as in 3D Printing, an inkjet printer required perhaps some artistic process first, before the actual printing step.

Here's what you'll have a lot of...
One other important point:  Because using the 3D Pen means having it closer to your face while you use it, you should ONLY use PLA - NOT ABS. It has been found that ABS Plastic often has harmful fumes, while most PLA does not.

Engadget wrote a post on this recently, which I try to share with everyone I know who does 3D Printing under any conditions - but I think it is even more important for 3D Pen use because of the likelihood of breathing in fumes.


Apr 10, 2016

Expanding Creativity With A 3D Printing Pen

3D Pens have popped up everywhere. Ok, not everywhere - like there are none in my sock drawer - but certainly in stores and online where, just a year ago, you would not have seen them.

If you have already tried a 3D Pen or bought one or generally know about them, you can stop reading now. If you wanted to understand the basics of what they are, this short post should help you.

What is a 3D Pen?
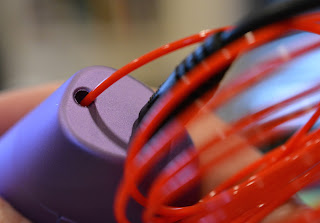

A 3D Pen is an electric tool which lets you create things out of plastic. It's a creative tool - perhaps it could even be called a toy. It is what I would call a modern version of play-dough.

Most 3D Pens take a strip of plastic "filament" into one side, heats it up to around 175 degrees Celsius (347 Fahrenheit!) and forces it out of the other side (tip) of the "pen" in a narrow stream allowing you to "draw" with it.

As the plastic dries, it hardens back into firm plastic, remaining in whatever form you created. If you've ever decorated a cake with one of those pastry bags, you pretty much know how to use a 3D Pen.

The plastic used is typically the same as that used by 3D Printers. PLA is the best option, as it has less harmful (or worrisome) fumes and melts at a slightly lower temperature (although, 345F is still pretty darn hot!). Some 3D Pens expect you to use their own "plastic sticks" - like the 3Doodler - but I prefer pens which are friendly to the same filament I'm using with my 3D Printer, so I don't have to buy separate material.
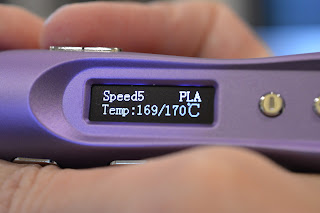
Scribber 3D Pen has a clear screen to show the settings

Controlling the 3D Pen


There are some basic controls on most 3D pens.

Temperature is the most important, as different plastic requires different temperatures.

Speed is another option on some pens, so you can control the rate at which the melted plastic comes out of the tip.

Then there's the motion - all pens which use plastic filament have both a forward (for drawing) and reverse (for removing un-used filament) - which allows you to "draw" or stop as you want to. That's pretty much it. Simple.

World's First, and My First - 3Doodler
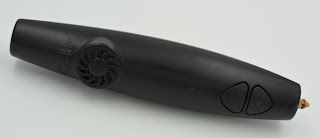

The 3Doodler 1.0 - the original
The first 3D Pen I ever saw - in September 2014 at the MakerFaire in NYC - and apparently the first one ever invented, was the 3Doodler.

That first version of the 3Doodler, which I bought pretty much at first sight, was good - but not excellent - which is pretty expected given it was the "world's first". It was loud (it even has a fan in it) and bulky and had inconsistent reliability in my experience and clogged a couple of times too.
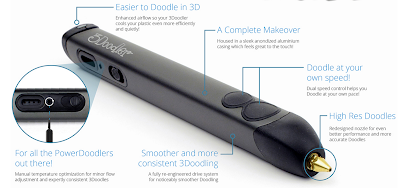
The 3Doodler 2.0 - from 3Doodler's site
That said, the first early 3Doodler helped me understand the concept well and frankly, amazed me.

Since then, the 3Doodler company greatly improved on their original design and now sells their second version which I don't own yet. IT has been considered by others to be a huge improvement over the first - Less bulky, quieter, more reliable.

I'll definitely try the version 2.0 3Doodler eventually, and I have the utmost respect for this company's founders, as they really innovated and broke new ground, defining this whole product category. You can now buy the 3Doodler in almost every innovative electronic-friendly toy or game shop and even in Brookstone and other high-end retailers.

3D Pens Galore
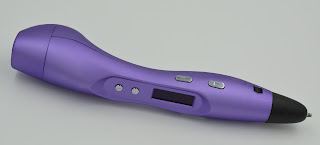

Scribbler 3D Pen
With 3Doodler's success in this new product category, it was inevitable that others would follow to create similar products. I've seen all sorts of variations on this theme now, but most are just basic knock-offs.

I decided to try one called the "Scribbler 3D Pen" (3rd generation). It was highly rated on Amazon and - at the time - was on sale for $69. (As of this writing, it is $99 in all the listings I could find).

I saw one completely new 3D Pen design at the NYC Toy Fair this past February called CreoPop - which uses liquid "ink" without heat - rather it uses LED lights to dry the ink as it emits from the pen's tip. This also seemed to allow more option in material with glow-in-the-dark, neon and more colors. This looked cool, but I haven't had a chance to try it first hand.

New 3D Pen version for kids coming
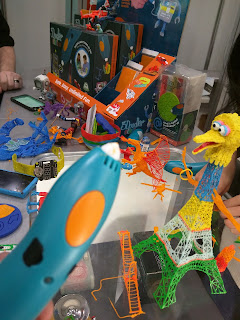

3Doodler Start and some creations
3Doodler is also showing and taking pre-orders for a completely new product called the 3Doodler Start.

This version operates at a much lower temperature with completely new filament which is non-toxic, making the whole kit much safer for younger kids!

I saw this product at the NYC Toy Fair in February 2016, and was VERY impressed. I expect this product to be a huge success for kids and schools if it proves to be reliable with reasonably priced filament. Nice to see 3Doodler continuing to innovate in 3D Pen Printing.

Conclusion


If you love crafts and Maker projects, and often have the opportunity to work with kids to encourage them to experiment and try new things - get a 3D Pen. Make no mistake - this tool is not for creating precision objects as you might do with a 3D Printer. This tool is mainly for creativity and art.

I haven't worked with enough different models to absolutely pick which is best and recommend a "winner" - but I will say that I've had great luck so far with the Scribbler 3D Pen myself and have heard good things about 3Doodlers 2.0 version.

Check ratings on Amazon and Google Shopping to get a broader opinion before buying.